
Nameservers are designated servers operating within the Domain Name System (DNS) that translate human-readable domain names (like “example.com”) into the numerical IP addresses that computers use to find each other. If you have registered your domains with GoDaddy, confirm that your nameservers include the correct information for your domain name. Here is the right guide you can follow
Example: DNS zone files are stored in GoDaddy accounts when a domain uses GoDaddy nameservers by default. The DNS zone file will be in the account of the company whose nameservers the domain uses.
Step-By-Step Guide to Update GoDaddy Nameservers
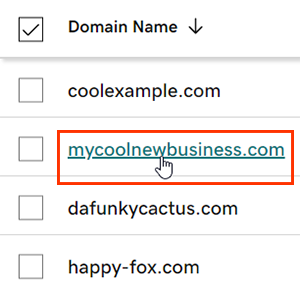
- First, you must sign in to your GoDaddy Domain Portfolio. If there are any login issues, you may find your username or password in the welcome email.
- Second, access the Domain Settings page by selecting the individual domain.
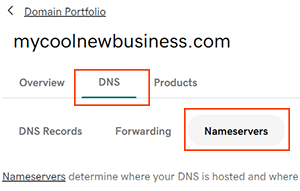
- Select DNS and then select Nameservers.
- Choose the nameserver setting that works best for you:
- GoDaddy Nameservers (recommended): We shall update your domain to use GoDaddy nameservers, so that you can manage DNS in your GoDaddy account.
- I’ll use my nameservers: Your DNS is managed elsewhere and through the GoDaddy account.
- Save all updates and click Continue.
Domain Protection requires you to verify your identity. You can enter the code we sent via SMS or the code from your authenticator app if you have turned on two-step verification for at least hours. Alternatively, enter the one-time password we sent to your registrant’s email address.
GoDaddy nameservers can be easily updated to direct your domain to your web hosting. Log in to your GoDaddy account, access your domain settings, change the nameservers, and save. Remember that global DNS updates may take up to 48 hours. Having the right settings for your nameservers is important for ensuring that your website is accessible.


