You have spent a lot of your time in building your Magento store by uploading your products on it as well as configuring the currency rate on your localhost and you are quite happy with that. But now is the time to get popular globally and gain customers from all over the world. For this, you need to upload your store on a live production server so that all can view your store.
In this tutorial, you will learn to transfer your Magento 1 store successfully to the live production server from your PC where no one can view it except you.
Prerequisites
At first, you need to purchase a domain. Here we will assume that you have done that but if not you can purchase it from any domain provider.
Check the below steps to upload a Magento store on a live server:
Step 1: Exporting Your Database From Localhost
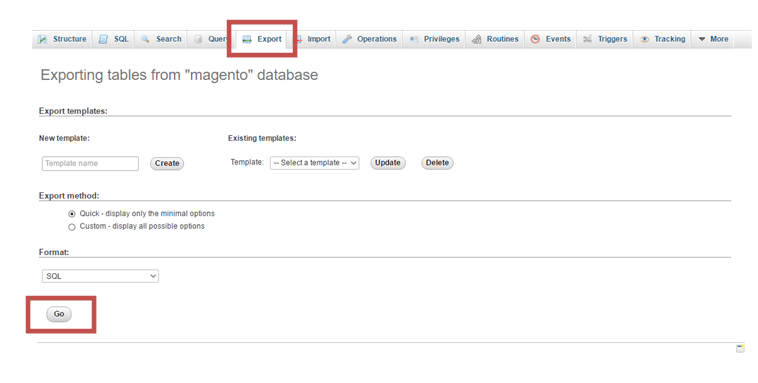
Firstly, login to phpMyAdmin account on your localhost on PC with the help of any localhost software. It might be WAMP, XAMPP or any other one which you work with. Then open the store’s database. At the top of the menu, click on the Export option and then hit the Go button. With this, the localhost will download the database files of your store in the form of .sql extension. Save it as it is or in a .zip format.

Step 2: Converting Your Magento Files in Zip Format
Here, you only need to zip all the Magento files that you will be uploading to the live server in some time. Go to the htdocs folder (if XAMPP) or www folder (if WAMP) and navigate to the Magento folder, and then compress all the files in the zip folder.
Step 3: Uploading Your Magento Files From Localhost to Your Web Server
Then upload your database to the domain via the cPanel. For this, login to the cPanel account on your live server and go to phpMyAdmin. Create a new database here.
Note down the important things such as the database name, username, and password. Click on the New button to create the database.
Step 4: Import Database
After creating the database successfully, import the database that was downloaded from the localhost on your PC to this new database created now.
Select the database that you have created and click on the Import tab on the top of the menu. In that, at the section Files to Import hit the Choose File button and select the file that you dump from your PC. Ensure that the format of the file is .sql.
Now, click on the Go button. This will take a few minutes to import the database.

Step 5: Uploading Your Magento Files
You can make a subfolder on your new domain or use the normal directory. Upload the zip file of the Magento file created in step 3. Once it is uploaded, extract that file there.
Step 6: Changing local.xml File for Access Magento System to Your New Database
It is time to make few changes in the local.xml file with your directory.
Go to app/etc/local.xml and select the local.xml file. In that you need to change the information related to your new database created on your domain. It includes the name, username and the password that was set while importing the database on your new domain. Find a place to fit this information. Also, replace the connection tag with the new one as below:
<host>host_name]]</host>

<username>user_name]]</username>

<password>database_password]]</password>

<dbname>database_name]]</dbname>
Step 7: Identifying Your New Domain Name for Magento System
Now you need to save the changes. In case you are editing on the browser, click on the Save button in the top right corner of the browser. However, if you select to download and edit the file, you have to upload it again within the right directory.
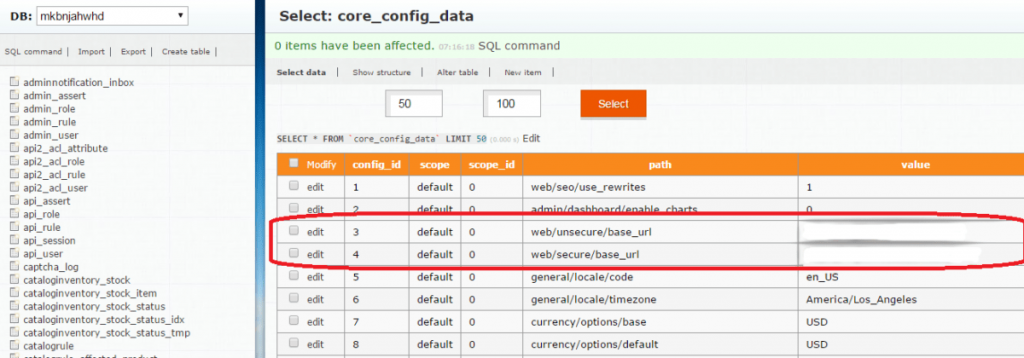
For this, hover to the Magento database and search Table Core_Config_Data. Change your localhost URL to your Domain name in the paths “web/unsecure/base_url” and “web/secure/base_url”.

Step 8: Clearing Cache
It is important to clear the cache that comprises the data from your localhost so that it will contain new data associated with your newly uploaded Magento store.
Go to /var/cache and delete all the files and content from there to clear the cache. Select all files and then click on the red-cross button that says Delete from the menu to delete all the files. It is also possible to delete them one by one by selecting file and right-clicking it and then selecting Delete.
Step 9: Accessing Your Store
After complete all the above processes successfully, your Magento store is uploaded on your domain from the localhost successfully. Go to the browser, enter your domain name or the public IP of your domain and press enter.
The frontend of your store will get displayed if you have followed the above steps correctly. It will appear similar on your localhost.
Conclusion
That’s it! With this article, you have learned to upload your site or Magento store from localhost to any live production server in a very easy way. You just need to maintain the backup of everything (database and Magento store files). In case you want to edit anything, it can be done in the browser or by downloading it. Hope this article helps you.


