Watch this video for a step by step process on How to Transfer Backup from cPanel to VPS
Taking data backups regularly is a good habit that helps you create a reserve copy in times of emergencies. You can easily do that by creating a data backup of the website and uploading it on your VPS server. In this article, you will learn how to directly transfer a website’s backup from cPanel to VPS.
To Transfer Backup from cPanel to VPS
1. Log in to your cPanel account.
2. Go to the Files section and click on Backup.

3. Click on the Download a Full Account Backup button.

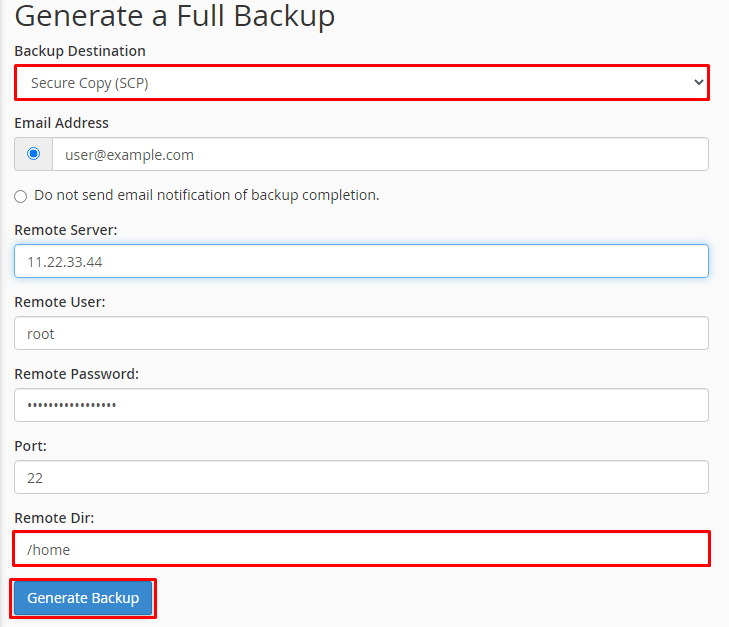
It will take you to the Generate a Full Backup form.
4. Choose the Secure Copy (SCP) option from the dropdown list and enter the valid details in every field.

- Email Address: Enter an email address where you will receive the notification for the completion of the backup transfer.
- Remote Server: Enter the IP address of your VPS.
- Remote User: Enter the username for the hosting account. If you don’t enter any, the system will consider the user as root by default.
- Remote Password: Enter the password for the user account.
- Port(optional): You can leave this field empty and proceed. However, if you are filling it, enter the port that was listed in VPS details.
- Remote Dir: Specify the directory path here for restoring the backup files on your VPS.
Note: You can leave the Remote Dir field empty. In that case, the backup files will get automatically transferred to the root file of your VPS.
5. Click on the Generate Backup button.
The system will display a message explaining that it is currently generating the Full Backup.

It will directly upload the backup file on the directory of the VPS and send a copy to the designated email address once it completes the process.


