
Apache is one of the most popular and widely-used web servers in the world. It is open-source, highly customizable, and can run on various operating systems, including Linux. This guide will walk you through the steps to install the Apache web server on Ubuntu 20.04, ensuring that your server is ready to host websites and web applications efficiently and securely.
Step:1 – Installing Apache
Apache can be installed easily from Ubuntu’s default software repositories using standard package management tools.
First, update the local package index to ensure it reflects the latest changes:
sudo apt update- Then, install the apache2 package:
sudo apt install apache2- After confirming the installation, apt will install Apache and all necessary dependencies.
Step:2 – Adjusting the Firewall
Before testing Apache, you need to configure the firewall to allow external access to the default web ports. Assuming you have a UFW firewall set up as per the prerequisites, you can proceed with the following steps.
During installation, Apache registers itself with UFW, providing several application profiles that can be used to enable or disable access through the firewall.
To list the UFW application profiles, type:
sudo ufw app list- You will see a list of available application profiles:
Output
Available applications:
  Apache
  Apache Full
  Apache Secure
  OpenSSH
These profiles serve different purposes:
- Apache: Opens only port 80 (normal, unencrypted web traffic)
- Apache Full: Opens both port 80 (normal, unencrypted web traffic) and port 443 (TLS/SSL encrypted traffic)
- Apache Secure: Opens only port 443 (TLS/SSL encrypted traffic)
It is best to enable the most restrictive profile that will still allow the necessary traffic. Since SSL is not configured in this guide, you only need to allow traffic on port 80:
sudo ufw allow 'Apache'To verify the change, type:
sudo ufw statusYou should see output indicating that HTTP traffic is allowed:
Status: active
To                     Action      From
--                     ------      ----
OpenSSH                ALLOW       Anywhere
Apache                 ALLOW       Anywhere
OpenSSH (v6)           ALLOW       Anywhere (v6)
Apache (v6)            ALLOW       Anywhere (v6)
Step:3 – Checking Your Web Server
Ubuntu 20.04 starts Apache automatically at the end of the installation process. The web server should already be running.
To confirm, use the systemd init system to check the service status:
sudo systemctl status apache2
- You should see output indicating that the service is active:
● apache2.service – The Apache HTTP Server
     Loaded: loaded (/lib/systemd/system/apache2.service; enabled; vendor preset: enabled)
     Active: active (running) since Thu 2020-04-23 22:36:30 UTC; 20h ago
       Docs: https://httpd.apache.org/docs/2.4/
   Main PID: 29435 (apache2)
      Tasks: 55 (limit: 1137)
     Memory: 8.0M
     CGroup: /system.slice/apache2.service
             ├─29435 /usr/sbin/apache2 -k start
             ├─29437 /usr/sbin/apache2 -k start
             └─29438 /usr/sbin/apache2 -k start
The best way to test Apache is to request a page from it. Access the default Apache landing page using your server’s IP address. If you don’t know your server’s IP address, you can find it by typing:
hostname –Ior
curl -4 icanhazip.comEnter your server’s IP address into a web browser:
http://your_server_ip
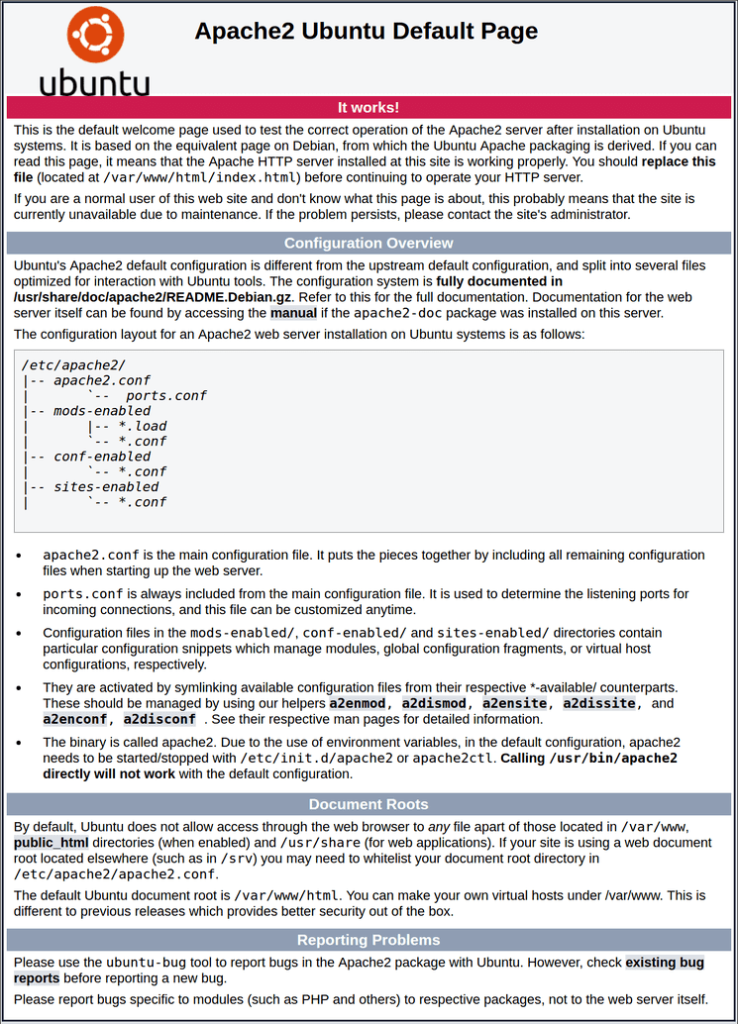
You should see the default Ubuntu 20.04 Apache web page, confirming that Apache is running correctly.
Step:4 – Managing the Apache Process
With your web server up and running, here are some basic management commands using systemctl:
To stop Apache:
sudo systemctl stop apache2To start Apache:
sudo systemctl start apache2To restart Apache:
sudo systemctl restart apache2To reload Apache without dropping connections (useful for configuration changes):
sudo systemctl reload apache2By default, Apache is configured to start automatically when the server boots. To disable this behavior:
sudo systemctl disable apache2To re-enable the service to start at boot:
sudo systemctl enable apache2Step:5 – Setting Up Virtual Hosts
Apache allows you to host multiple domains on a single server using virtual hosts. We’ll set up a virtual host for a domain called your_domain. Replace your_domain with your actual domain name.
- Create the directory for your domain:
sudo mkdir /var/www/your_domain- Assign ownership of the directory:
sudo chown -R $USER:$USER /var/www/your_domain- Set the correct permissions:
sudo chmod -R 755 /var/www/your_domain- Create a sample index.html page:
sudo nano /var/www/your_domain/index.htmlAdd the following HTML:
<html>
    <head>
        <title>Welcome to Your_domain!</title>
    </head>
    <body>
        <h1>Success! The your_domain virtual host is working!</h1>
    </body>
</html>
Save and close the file.
Create a virtual host file for your domain:
sudo nano /etc/apache2/sites-available/your_domain.confAdd the following configuration:
<VirtualHost *:80>
    ServerAdmin webmaster@localhost
    ServerName your_domain
    ServerAlias www.your_domain
    DocumentRoot /var/www/your_domain
    ErrorLog ${APACHE_LOG_DIR}/error.log
    CustomLog ${APACHE_LOG_DIR}/access.log combined
</VirtualHost>
Save and close the file.
Enable the new virtual host:
sudo a2ensite your_domain.conf- Disable the default site:
sudo a2dissite 000-default.conf- Check for configuration errors:
sudo apache2ctl configtestYou should see:
Syntax OKRestart Apache to apply the changes:
sudo systemctl restart apache2You can now navigate to http://your_domain to see the new site.
Step:6 – Familiarizing Yourself with Important Apache Files and Directories
Now that you know how to manage the Apache service, take a moment to learn about important directories and files:
Content Directory:
/var/www/html: The default directory for web content. Can be changed by modifying Apache configuration files.
Server Configuration:
- /etc/apache2: Main Apache configuration directory.
- /etc/apache2/apache2.conf: Main Apache configuration file.
- /etc/apache2/ports.conf: Specifies the ports Apache listens on.
- /etc/apache2/sites-available/: Stores per-site virtual host configurations.
- /etc/apache2/sites-enabled/: Stores enabled per-site virtual host configurations.
- /etc/apache2/conf-available/ and /etc/apache2/conf-enabled/: Stores general configuration fragments.
- /etc/apache2/mods-available/ and /etc/apache2/mods-enabled/: Stores available and enabled modules.
Server Logs:
- /var/log/apache2/access.log: Logs all requests to your web server.
- /var/log/apache2/error.log: Logs all errors.
These directories and files are essential for managing your Apache server effectively.
Congratulations! You have successfully installed and configured the Apache web server on your Ubuntu 20.04 system. With Apache up and running, your server is now ready to handle web traffic and serve your websites. You can further customize your Apache configuration to meet your specific needs, ensuring optimal performance and security for your web applications. If you have any further questions or need additional assistance, feel free to reach out.


