The Mac host file serves a number of purposes. However, it’s particularly important when you want to map to a new Internet Protocol (IP) address overriding your Domain Name System (DNS). This file needs to be located and accessed in that situation.
It’s relatively easy and quick to do so. It is simply a matter of knowing which application to use and what commands to enter. Your Mac device will then be able to resolve domain names to IP addresses when you edit and update the host file.
This post explains what the Mac hosts file is and what it does. In four simple steps, we’ll show you how to find and edit it. It’s time to get started!
Know All About the Mac Hosts File
With the help of DNS in the nameservers you can find the website. This DNS translates your URL into an IP address that the server can interpret.
For those who don’t know what a host file is, it is an operating system file that maps hostnames to IP addresses. In this guide, we will be discussing altering hosts file in Mac OS. Web developers modify the file to check the new website’s look under development stage.
One major reason to edit the hosts file is to migrate your website to a new server. Hence, we have brought these steps to edit hosts file in Mac OS manually. Use the Mac hosts file to test the website and ensure all functionalities are performing all right.
Before migration this testing is necessary. Follow the mentioned below steps to locate and edit the Mac OS hosts file.
Steps to Find and Edit Your Mac Hosts File
1. Open Terminal Application
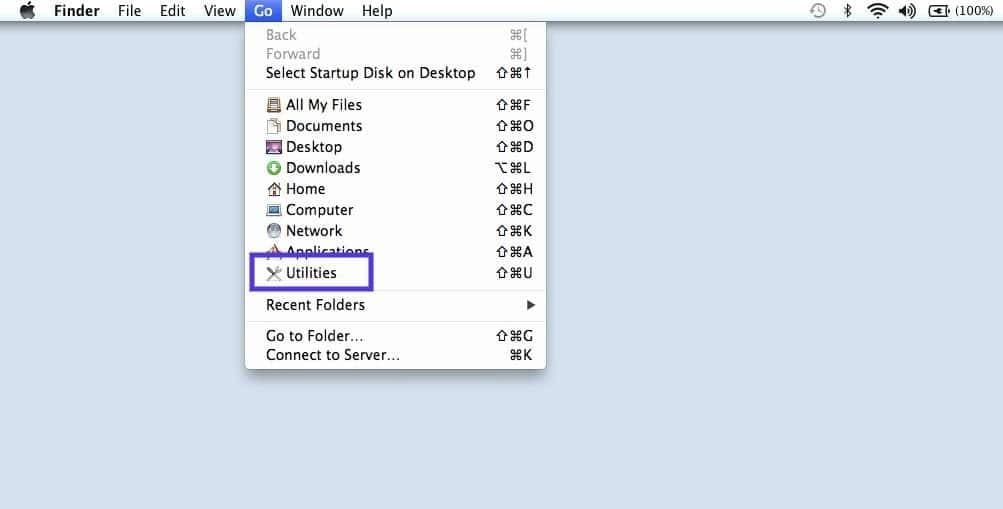
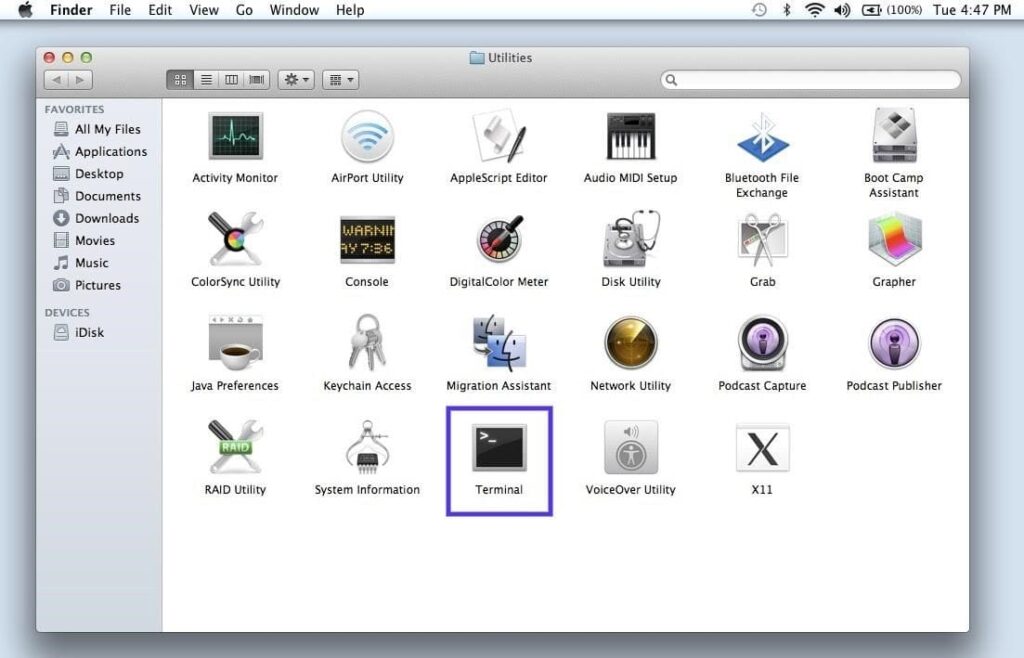
First, open the Terminal application from the Finder Menu. In this menu, go to Utilities. You will find plenty of applications but navigate to the Terminal application.

Alternatively, Press F4 to open a launcher and type terminal to navigate to Terminal. It’s a shortcut method to reach that application.

2. Access Your /etc/hosts Folder
After opening the Terminal application, navigate to hosts file. You will find it in the /etc/hosts folder. However, the text editor access is enabled. We will consider the example of the Nano text editor for this article.
Execute the following command in the Terminal application. With this, you can install the updated Nano program version.
sudo nano /etc/hosts
Next, type the administrator password and press Enter to proceed further.
3. Begin Editing Your Mac Hosts File
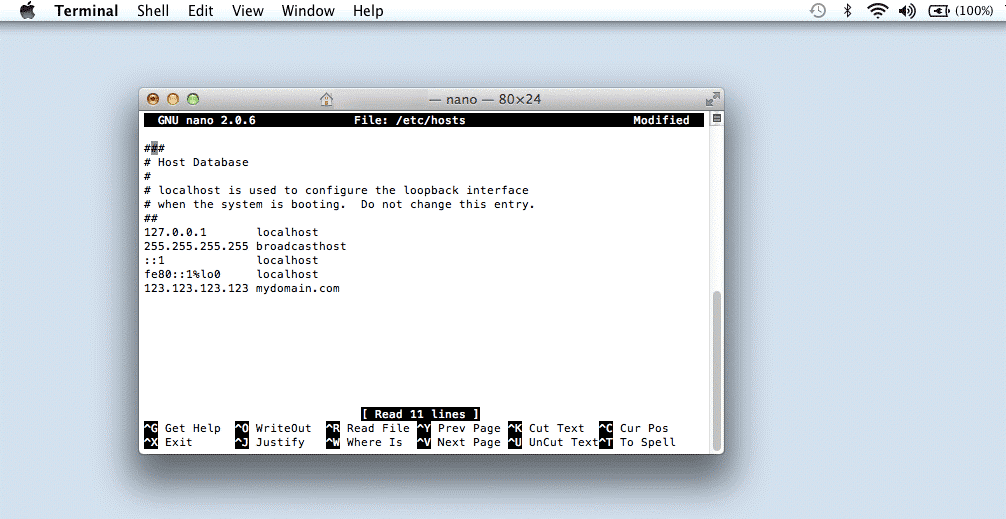
After executing the above command, the Nano text editor will appear. Here is the expected screenshot.

Further steps will depend on what activities will you do with the hosts file. We assume you are trying to add a new domain name.

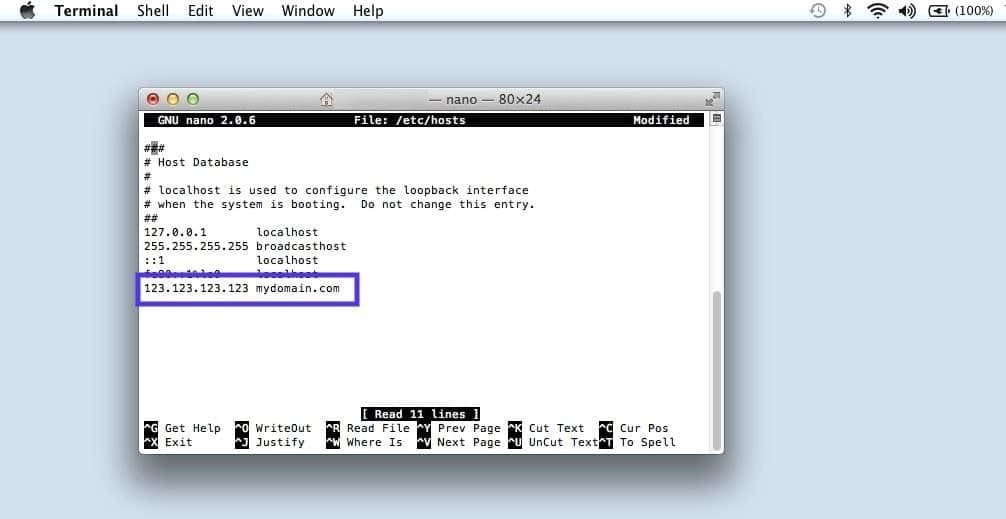
Using your arrow keys, you can navigate to the bottom of the file. You will then need to add the IP address of the domain you wish to add on a new line:
Our new domain name is “123.123.123.123” as you can see in the screenshot above. If you’re adding something, you’ll need to replace “mydomain.com” and “mydomain.”.
You should also add a line for each entry. The following format should be used for multiple entries:
SERVER_IP_ADDRESS domain.com
SERVER_IP_ADDRESS www.domain.com
Using your keyboard, you can delete the line(s) you’ve added if you want to cancel the changes you’re making. At the bottom of the editor window is a list of key menu options.
Besides adding IP addresses, you can also block them to prevent your device from pointing to them. “127.0.0.1” can be used for that.
After you’re done, press Ctrl + O and Enter/Return to overwrite the existing file. Ctrl + X will exit the program.
4. Remove Your DNS Cache
When your Mac hosts file has been edited, but your changes aren’t reflected, the problem may be with your DNS cache. When you finish editing a file, flushing your cache is a good idea.
The process of flushing your cache removes saved IP records. The updated IP address will be reflected in your browser as a result of this process.
Enter the following command into the Terminal application to update your browser DNS records:
sudo killall -HUP mDNSResponder
In this step, you will ensure that your changes will appear in your browser as soon as possible. Your Mac hosts file has now been edited successfully!
A new server migration can be a challenging task. MilesWeb offers free website migration to all clients. While testing new sites and even running migration technical expertise. We know many users might not have it. Thus, follow this guide or connect with our techies any time through chat, email, and phone.


