Moodle allows to setup user permissions or roles globally within the site administration section. Visitors, Guests and Users can be assigned a special role or permission when they visit and login to the site. In this tutorial, you will learn in details about the User Profiles.
Steps to Setup User Permission Policies
Login to your Moodle dashboard.
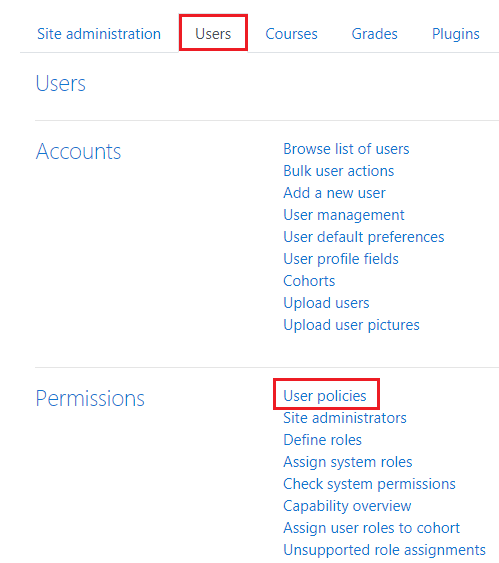
Go to the Site administration -> Users -> Permissions -> User policies.
Note: Remember to keep Blocks editing on in the top left-side of the Site administration for editing any of these options.

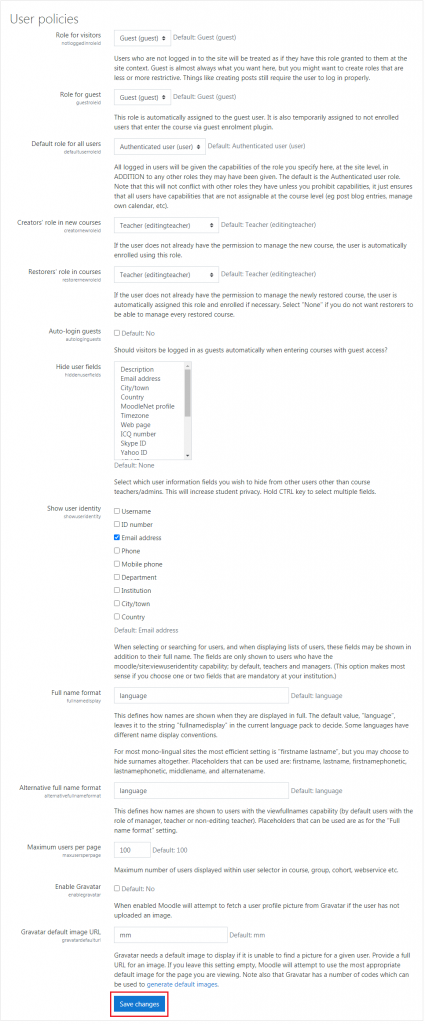
The User Policies section will get displayed and it is for setting the default settings. You can allow each role from visitors, guests and users have its permission set. These being the global settings will affect the complete User Permissions of the site. Check the below settings under the User Policies:

| User Policy Settings | Description |
|---|---|
| Role for visitors | The Role for visitors enables the administrator to grant permissions to visitors so that they can perform activities like posting comments. It is specifically for those who haven’t logged into the Moodle site. You can restrict or unrestrict the visitors to the site on their access in this section. |
| Role for guest | It sets the value for the Guest users who log in. This will be Default to Guest (guest). |
| Default role for all users | It will set the role for all users that are logged in. The Default is Authenticated user (user). |
| It will set the role for all users that are logged in. The Default is Authenticated user (user). | It will set the Administrator of the sites permissions to manage the new courses. By default it is set to Teacher (editingteacher). You can change it to the Manager or non-editing teacher. |
| Restorers’ role in courses | It will set the Administrator of the sites permissions to manage restored courses. By default it is set to Teacher (editingteacher). You can change it to the Manager or non-editing teacher. |
| Auto-login guests | You can enable or disable the auto-login for guests in the courses with this setting. |
| Hide user fields | It allows the administrator to remove user fields to keep student information private. |
| Show user identity | It allows you to provide a basic identification for the users. With this, you can search and display lists of users. |
| Enable Gravatar | In case there isn’t any image uploaded for the user, enabling this option obtains an image from Gravatar. |
Once done with the above settings, click on Save changes.
In this way, you have learned to configure the user permission policies in Moodle.
Also Read
Modifying Site Administrators in the User Permissions Section of Moodle


