Introduction:
The `C:\\Windows\\WinSxS` directory stores DLLs, binaries, and XML files. These files are fundamental for installing and running most of the Windows roles and features. In this insightful article, we will uncover why the WinSxS folder in Windows keeps increasing in size and the methods to clean it up. So let’s begin.
Whenever Windows updates are installed (usually on the monthly frequency installs), the new version of the updated component is installed, and it retains the earlier version in the WinSxS folder, ensuring consistency and the potential to roll back to previous versions of the components when an update is removed.
Over time, WinSxS folder size continues to accumulate. While having no file size limit, folder size can easily grow up to 15-20 GB on Windows Server.
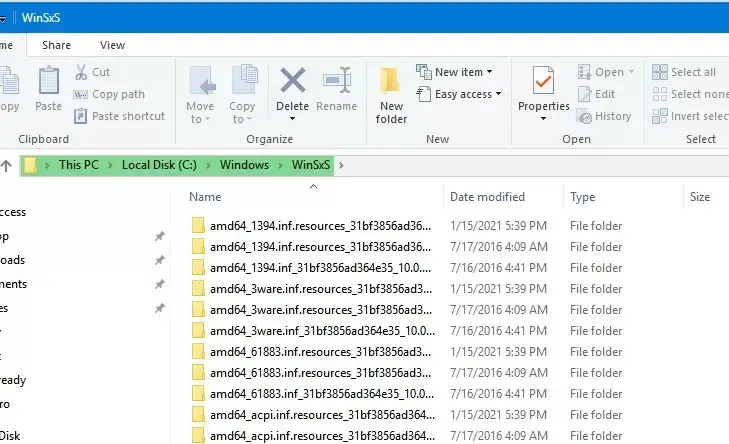
Table Content:
The article will address the following issues:
Wipe out obsolete versions of Windows component files that exist post-update and maximize the Component Store.
Make use of the Features on Demand option to erase unused Windows components stored in your disk space.
Turn on NTFS compression for the WinSxS folder to decrease the size of the WinSxS folder.
Key point to remember: The most frequently asked question from users is if it is safe to delete files manually from the WinSxS folder. The answer is absolutely no! Doing so will damage your Windows installation. Some manual deletion attempts may seem successful, but this approach is not recommended and could lead to serious system issues.
Determine the Size of the WinSxS on Windows Server
Using File Explorer, the simplest approach to view how large the WinSxS folder is by checking its properties in the %windir%\\WinSxS folder or, alternatively, writing a PowerShell script. The downside to this is that most file managers, including File Explorer, indicate an amount bigger than the size taken by files with even a single byte allocation.
This size mismatch is created because the WinSxS directory contains numerous hard links (symbolic-links) to system files contained in different folders. File managers would count the sizes of the referred files, which do not take up more space on disk.
To display the actual disk space occupied by the WinSxS folder, make use of the du tool from Sysinternals as follows:
du -v c:\\windows\\winSXS
You can also find out the size of the component store (WinSxS folder) by issuing the DISM command in the following syntax:
Dism.exe /Online /Cleanup-Image /AnalyzeComponentStore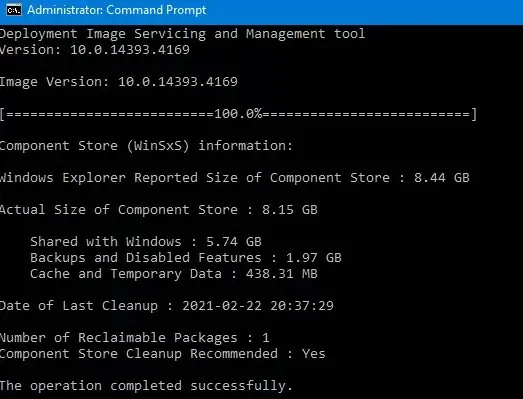
After the successful execution of the following command, you’ll see that the file size has been reduced.
Cleaning up the WinSxS folder (Component Store)
The cleaning of your WinSxS folder requires a deep optimization. For the seamless optimization, use the command below:
Dism.exe /Online /Cleanup-Image /StartComponentCleanup
Note: StartComponentCleanup DISM works with Windows Servers. Therefore, from Windows Server to the latest Windows Server version, you can use StartComponentCleanup DISM effortlessly.
When the cleaning operations are overseen, what does your current component store size become? For this task, you can use the command line to perform the following actions:
Dism.exe /Online /Cleanup-Image /AnalyzeComponentStoreAfter the cleanup process, we will no longer be able to remove from the system any installed updates or service packs.
In order to remove orphaned versions of components, run the following:
Dism.exe /Online /Cleanup-Image /StartComponentCleanup /ResetBaseNote: There is an additional Disum in the case of several Windows Server versions. The below command needs to be executed to remove the orphan components that remain after the service packs are installed.
DISM /online /Cleanup-Image /spsupersededWe can also use it to delete unwanted previous update files through the “Disk Cleanup” wizard.
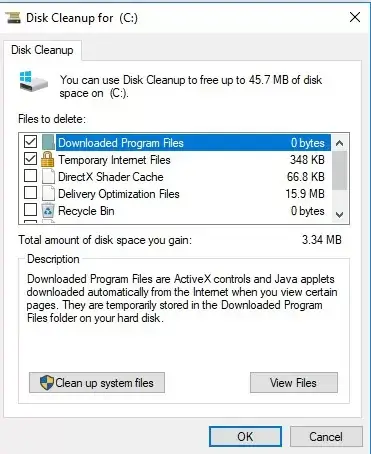
To begin with, execute the command prompt cleanmgr as an administrator.
After that, select the disk and on the next screen, press the “Clean up system files” option.
Lastly, click on “Windows update cleanup.”
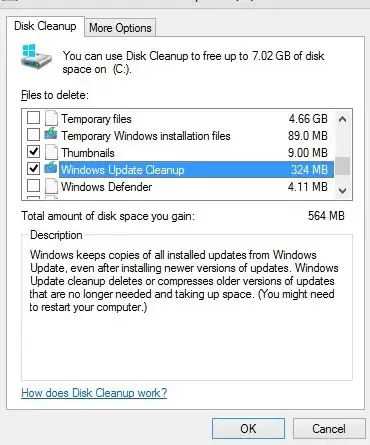
This is informative because it shows us how much disk space we will be able to free by deleting the older Windows update files.
After executing the DISM clean command for clearing the component store, we may now check how much disk memory has been released.
Using the Features on Demand option
Role and feature binaries on Windows Server also make room for the space. Thus, Features on Demand on Windows is used to delete the binary files of unused roles from the WinSxS folder without much hassle. Use the Uninstall-WindowsFeature PowerShell cmdlet.
Remember that several Windows versions do not contain the Uninstall-WindowsFeature cmdlet. Hence, you need to use DISM.exe to remove features from the Windows image.
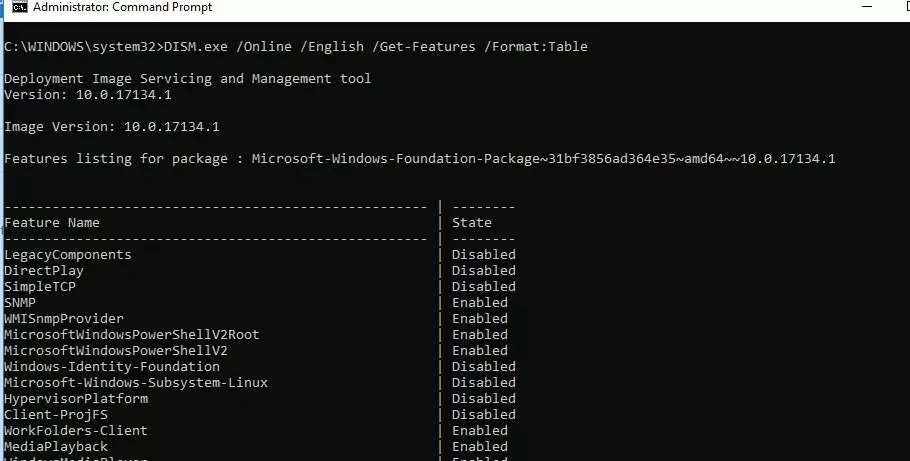
From the above list of Windows images, choose any one that you want to remove and run the command.
DISM.exe /Online /Disable-Feature /Featurename: ImageName /RemoveReplace the ImageName with the name of the file you want to remove.
Enable NTFS Compression on the WinSxS Folder in Windows Server
In Windows Server, you can reduce the WinSxS directory’s size. For this WinSxS’s contents can be compressed using the NTFS file system.
Note: A full backup of your Windows Server image is strongly recommended before making any non-standard changes.
Open the Command Prompt with administrative privileges.
Stop and disable the Windows Installer and Windows Module Installer services using the following commands:
sc stop msiserver sc stop TrustedInstaller sc config msiserver start= disabled sc config TrustedInstaller start= disabledUse the built-in icacls tool to back up the Access Control Lists (ACLs). These are independently assigned to the files and folders under the WinSxS directory. Windows will then create a document without borders that includes a list of files and directories and their corresponding NTFS permissions. In the future, this backup will be essential in recovering the original ACLs.
Command:
icacls "%WINDIR%\WinSxS" /save "%WINDIR%\WinSxS_NTFS.acl" /t
Now, to own the WinSxS folder and all the subfolders within it, follow the steps below:
Utilize the takeown command to allow yourself to be the one in charge of the WinSxS folder and all the folders within it.
takeown /f "%WINDIR%\WinSxS" /rGrant Full Control Permissions:
Grant your user account full control permissions for the WinSxS directory:
icacls "%WINDIR%\WinSxS" /grant "%USERDOMAIN%\%USERNAME%":(F) /tCompress Files in the WinSxS Directory:
Use the compact command to compress the files of the WinSxS folder. Since some of the files will be in use with Windows, include the /i option to avoid interruptions. Within Windows Server you might prefer the more sophisticated compression named
LZX:compact /s : %WINDIR%\WinSxS /c /a /i * .
End Ownership to TrustedInstaller
You want the ownership of the WinSxS folder reverted to its original owner, that account TrustedInstaller. Just go to the PowerShell. Write the following:
icacls "%WINDIR%\WinSxS" /setowner "NT SERVICE\TrustedInstaller" /tUse the ACL backup file created earlier to restore the original permissions of the WinSxS folder and its items:
icacls "%WINDIR%" /restore "%WINDIR%\WinSxS_NTFS.acl" Reset Services to Default Startup Type:
Restore the default startup type for the Windows Installer and Windows Module Installer services:
sc config msiserver start= demand sc config TrustedInstaller start= demand Check the Current Size of the WinSxS Folder:
Once the compression is complete, you can check the folder size. In one case, it decreased the size of the WinSxS folder and freed up approximately one-third of the space—big for smaller SSD drives.
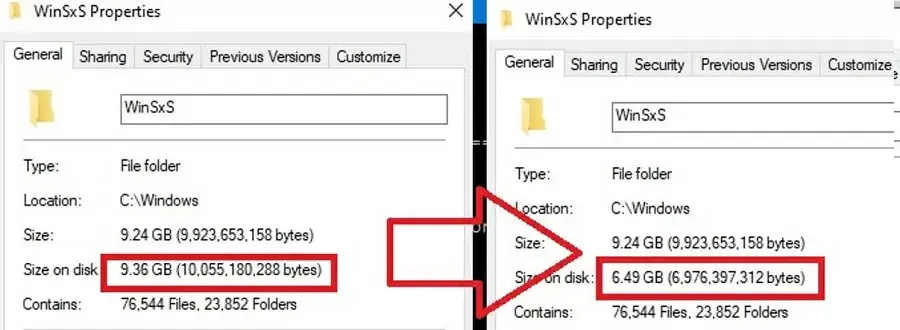
Note: For convenience, you can download a ready-to-use batch file named winsxs_ntfs_compress.bat to enable NTFS compression on the WinSxS folder.
It is essential for organizations to keep the WinSxS folder clean as it aids in optimizing disk space and maintaining the overall performance of the system, especially if it is running on Windows Server. If users optimize the component store and utilize Features on Demand and NTFS compression, they are able to make the directory’s size manageable without sacrificing the integrity of the system.
As for the folder size reduction and cleaning solutions, you can use software like DISM or get rid of the files by using Disk Cleanup. At the same time, it is important to note that you should not try to delete anything from the WinSxS folder as it can damage the entire Windows installation. Take time to assess the results of using each method to assist you in choosing whether to escalate.


