Watch this video for a step by step process on How to Change the Hostname of a WHM/cPanel Server
You may not have to change the hostname of your web server very often. However, you can do so easily from your WHM/cPanel with a few steps.
To Change the Hostname
1. Log in to WHM using your root account.
2. Select the Networking Setup option from the navigation menu. 
3. Click on Change Hostname.

4. Enter a new hostname for your web server in the Change Hostname field and click the Change button.

Things to consider before choosing a new hostname:
- Keep it non-controversial and socially acceptable.
- The hostname must be an FQDN.
- There should be two dots in the hostname and, it should never begin with “www”
- Hostnames should also not start with a digit should not have a hyphen “-” in the end.
The system will resume the process to change the hostname, which may take a couple of minutes.
As you scroll down to the end, you get to read a message:

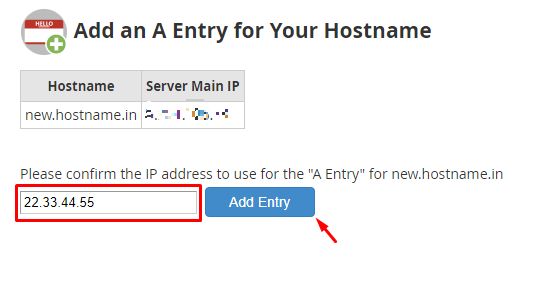
5. You will have to click the Add an A entry for your hostname button.
6. Here, you have to enter a new IP address for the “A Entry” for your hostname in the text box and click the Add Entry button.

The system will confirm if the IP address is unique and assign it to your hostname.
If the IP address is already in use by some other entity, the system will fail to assign the A entry to your hostname.
With it, you will have successfully changed the hostname for your web server.


