Instagram is the favorite among all social networks and its popularity has made it a major platform for marketing opportunities.
This has been proven as 80% of Instagram users have purchased something they discovered on the platform.
Moreover, 60% of the active visitors of Instagram visit the website daily which means they are really engaged with a particular website or brand.
But those who haven’t used the platform earlier or those who want to learn the advanced Instagram usage should know some tricks, settings, search options, hacks, and comment features.
We have bought all of them in one place for you.
Are you a recruiter who wants to showcase your company’s culture, or a marketer in the eCommerce industry, or an individual who wants to use
Instagram in the best ways possible? Check these tips and features that will help you learn advanced Instagram.
General Hacks for Instagram
1. Get Notified from Your Favorite Accounts
You might have at least one such account that you love to follow. Or maybe you are always checking for updates on a profile that you love. Do you want to get notified whenever there’s something new posted by your favorite profile?
You can turn on Post Notifications for your favorite accounts so that you receive the push notifications when any content is posted by them.
For this, go to your favorite Instagram profile, tap on the Following button. Then tap on Notifications and toggle on notifications for new posts, stories, live videos, or IGTV videos.
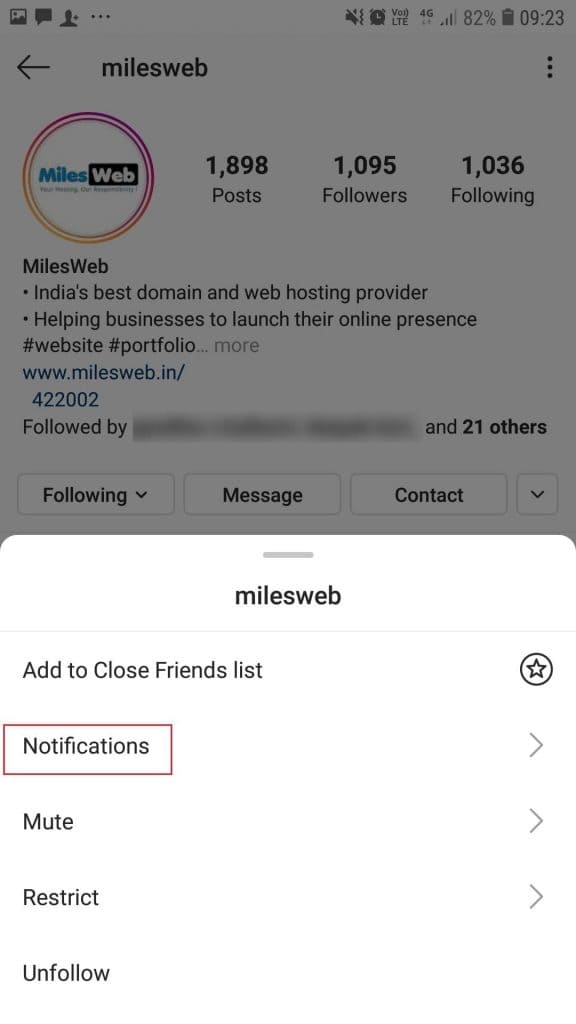
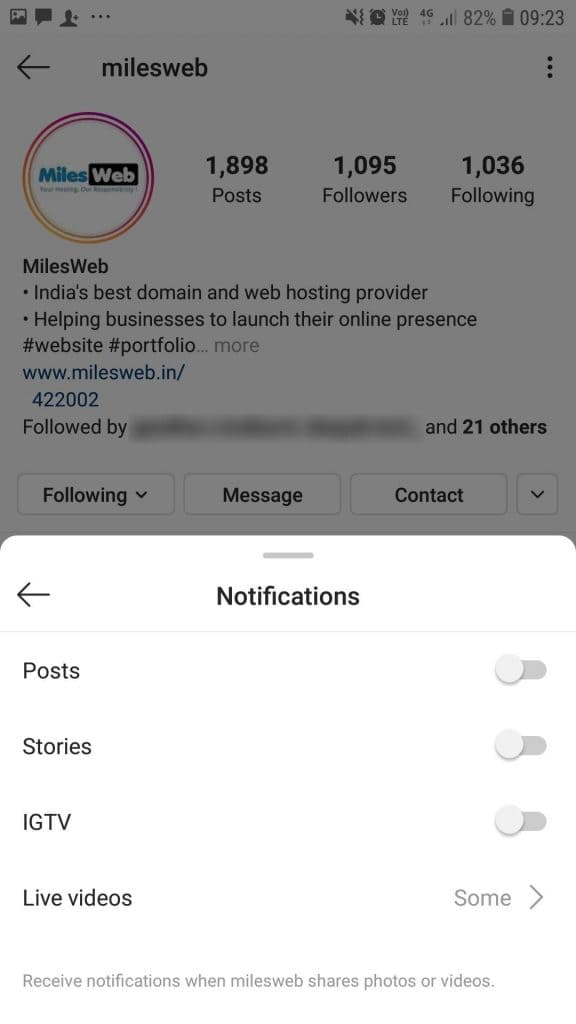
If you want to turn off the post notifications, follow the same steps. But check if you have enabled the notifications from the Instagram app in your phone’s settings.
Enabling notifications on iPhone/iPad: Go to Settings -> Notifications -> select Instagram and turn on the setting to Allow Notifications.
Enabling notifications on Android: Go to Settings -> Apps -> select Instagram -> App Settings -> Notifications and turn on the option to display notifications.
2. Don’t Know the Instagram Account But Want to Search a User
Are you looking for a user on Instagram but don’t know its account name? No worries you can still find that user in two ways without logging in:
Entering a Username at the End of the Instagram URL
In the first method for searching users without an account, you can add the Instagram username if you already know at the end of “www.instagram.com/”.
For example, if you want to check our Instagram username, you can enter the below into your browser’s address bar: https://www.instagram.com/milesweb/. With this, you will get to see our Instagram profile and the subtle search bar at the top of the page:
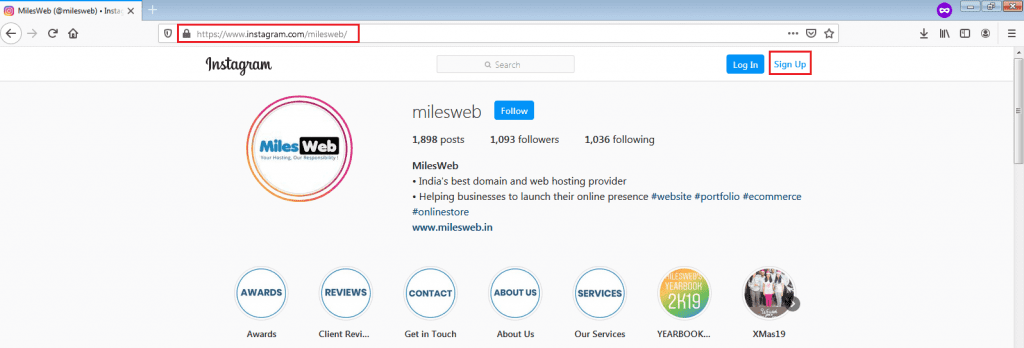
After reaching this page, use the search bar to the left of the “Sign Up” button for browsing users that are already active on the platform.
Googling Users in an Instagram Site Search
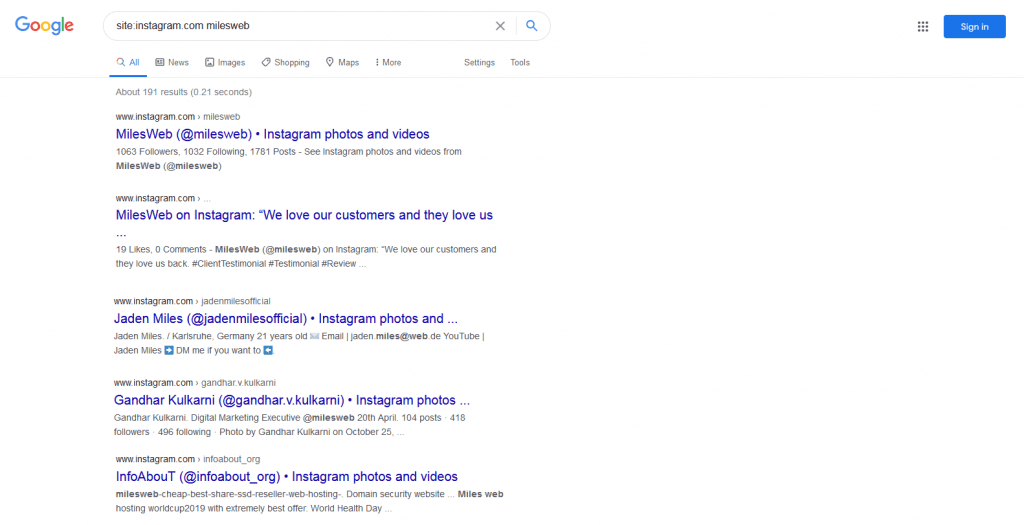
This is a bit tricky way of searching for users without an Instagram account of your own. Just search the user’s name in a Google site search. It is simply telling Google to search for a term on your choice of the website that is Instagram.
For searching a user on the site, open Google search and type the following: “site:instagram.com [name of user].”
You can shuffle through the names of people and businesses, keeping all the text before the brackets in your search bar. With this, Google will display results that are active only on Instagram.
By keeping all the text prior to the brackets in your search bar, you can shuffle through the names of people and businesses and Google will produce results that live only on Instagram. Check below the site search for MilesWeb. As you can see, Google displays our main profile, our About information, Instagram posts that include the #milesweb hashtag, etc.
3. Use Special Fonts in Your Bio
By using special fonts in your bio your profile will stand out. No doubt you can add emojis to the bio beneath your profile photo, but there is a restriction on the keyboard and this is where your creativity stops.
There are some of the basic third-party websites from where you can copy over some more special fonts which aren’t readily found in the Instagram community.
Adding a Special Font to Your Bio via Mobile
You can add a new font to your Instagram bio from your mobile with a website like LingoJam. Just open the site on your phone, type your preferred bio text in the above text box and the same bio text will appear in different typefaces as in the below image:
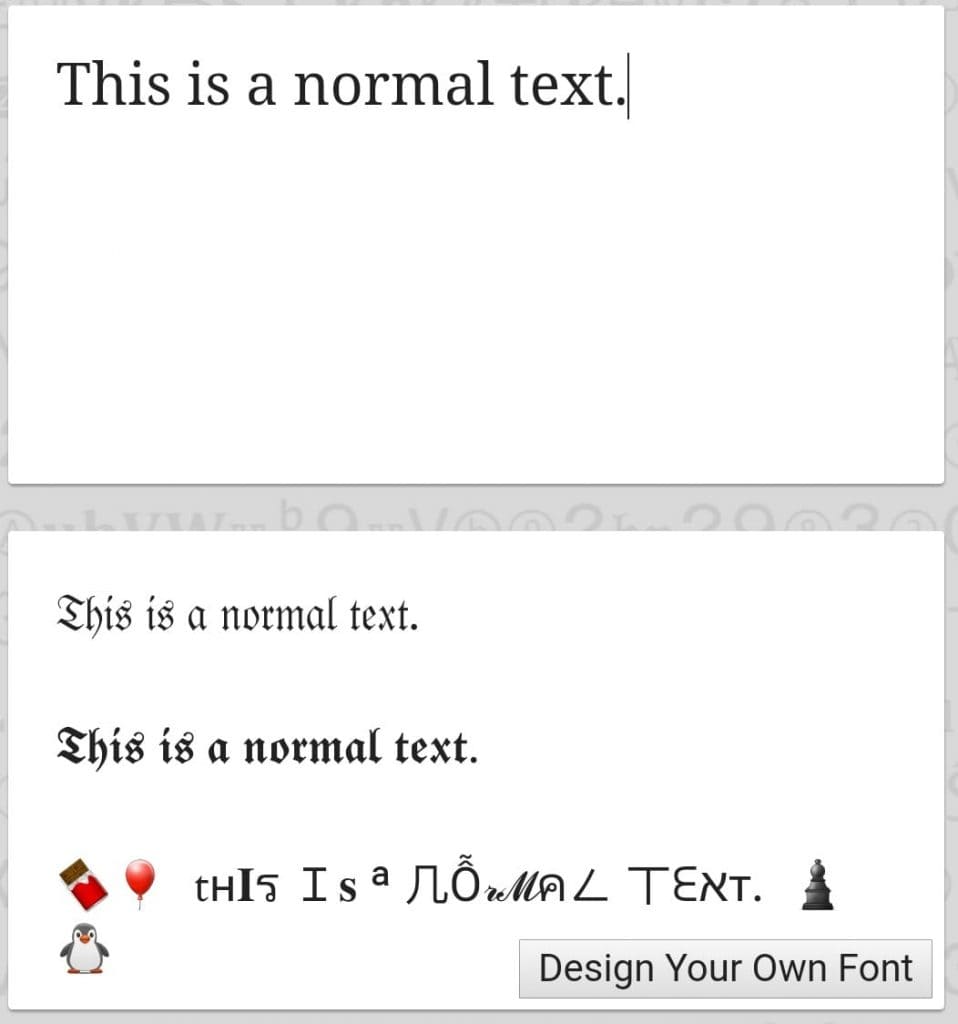
Then just tap the font you like and select Copy. Go to your Instagram app-> Profile-> Edit Profile-> Bio and paste the selected font into the empty field.
Adding a Special Font to Your Bio via Desktop/Laptop
For editing your Instagram profile on your desktop or laptop, go to Font Space and check for the library of fonts. You can download your favorite and copy it into your bio within a few seconds. At first, find a font that you like and click on the Download font icon next to it as below:

A folder will get open on your desktop, from where you can copy the .ttf file that comprises various versions of this font and paste it to your computer’s clipboard. In some cases, you will need to install the font to use it. Open Instagram.com in your browser and login to your account. Go to Profile -> Edit Profile -> paste the downloaded font into the Bio field. Next, you can edit the sample text that appears when you pasted the font to write your bio.
4. Adding Special Characters to Your Bio
It is possible to customize your bio with a special font as well as add typical characters that help you or your brand stand unique. However, you won’t find it on your smartphone’s normal keyboard. Such characters include §, †, or even ™ if your Instagram name represents a trademarked product name.
How to Add Special Characters from Mobile?
From your smartphone, install a free app like Character Pad. It includes almost every character and symbol you might need but isn’t available in the 26-letter English alphabet.
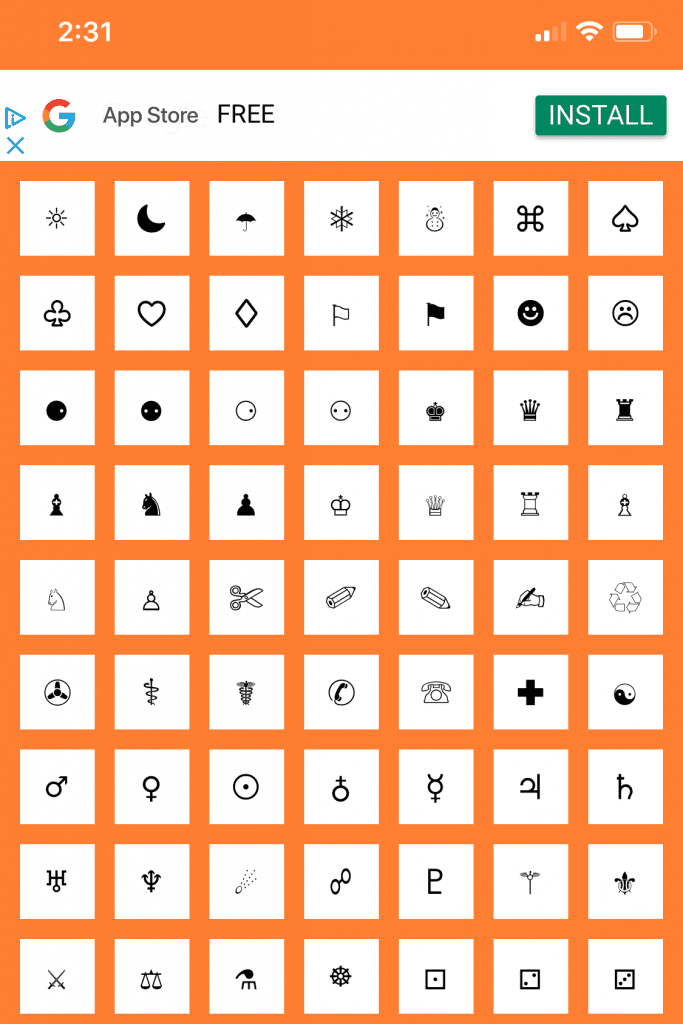
Open the app and search for the character you want to add to your bio. Just tap the picture of the symbol you want to add, paste it into their Type text here box and click on the copy icon to copy it. You can also copy it to your computer’s clipboard and copy it from there.
After copying the symbol to your clipboard, open Instagram, go to your Bio, and click on “Edit Profile”.

Hold down your finger on the field of your bio for inserting your special character until the “Paste” option appears. Tap on “Paste” and then click on the tick-mark in the top-right corner to save the changes to your bio.
How to Add Special Characters from a Desktop/Laptop?
It is possible to insert special characters and symbols via Instagram’s web client on a laptop or desktop. You can easily do that by using Microsoft Word’s “Symbol” insertion icon.
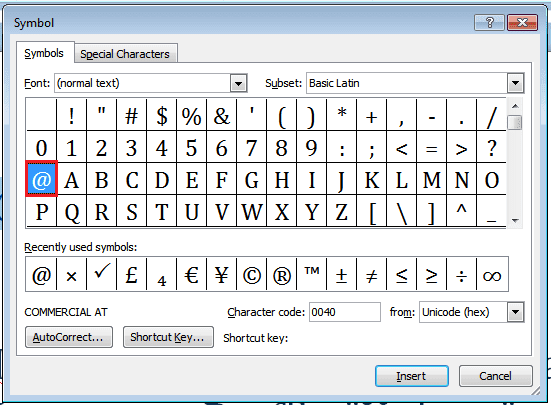
Choose your preferred symbol or character and copy it to your laptop’s/desktop’s clipboard. Next, head to Instagram.com and follow the steps mentioned above for pasting your character in your bio.
You can also Google search the symbol or special character you want and follow the above-mentioned steps for using it in your bio. Remember all the special characters copied from the internet aren’t clean when you use them on Instagram. You might get some of them as corrupted or maybe some won’t appear correctly.
Related: The World Is Home And Watching You! Tips To Get More Creative With Your Instagram Posts!
5. Viewing All the Posts Liked by You
Want to see the posts that you have “Liked” all in one place? Go to your profile and click on the Settings button in the top right – a gear icon on iPhone/iPad, and three dots on Android. Next click “Account”, and finally “Posts You’ve Liked”.
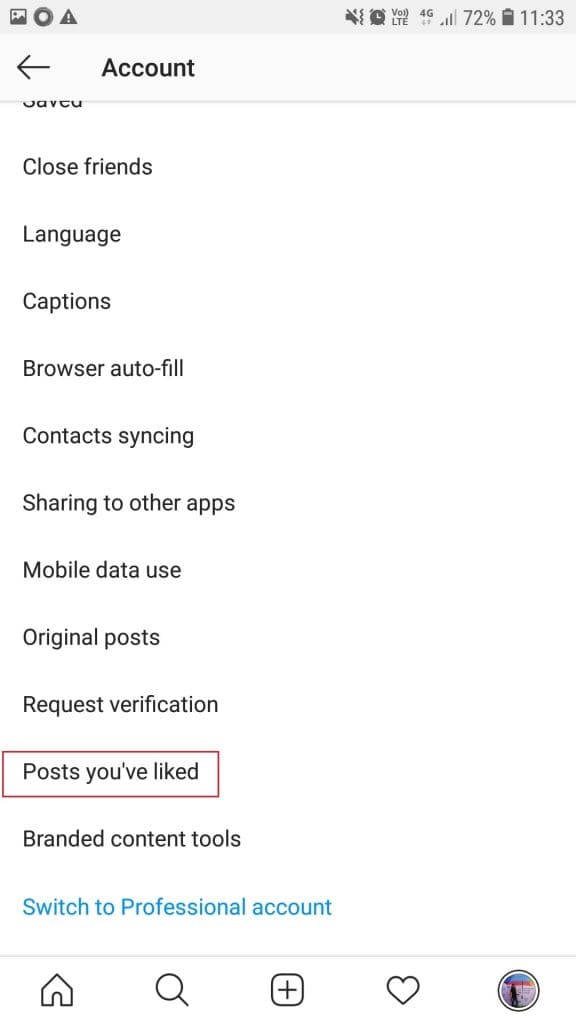
If you want to un-Like any of the posts you’ve Liked, go to the post and deselect the “heart” icon below it. The user won’t get notified that you’ve un-Liked the post.
6. Viewing the Pictures Without Accidentally Liking Them
It is quite easy to like something on Instagram and so, you might sometimes accidentally like some post which you didn’t want to. Just a quick double-tap on the photo in full view and a “Like” is counted.
If you want to check someone’s photo without liking it, scroll through the Instagram feeds with your phone set to airplane mode. Since there won’t be Internet access, you won’t be able to “Like” a photo even if you double-tap on it by mistake.
Remember, the picture won’t load, if you set the airplane mode at first. Instead go to the feed first for loading the posts then turn on the airplane mode, and keep on scrolling.
After reaching the end of the first rows of posts, if you want to load more, just turn on the airplane mode off, let the posts get loaded, and again turn on the mode. Though it is a bit hefty, it is better than liking it mistakenly.
- Switch on Airplane Mode on an iPhone/iPad: Swipe up from the bottom of the screen and click the airplane icon. Or navigate to Settings -> Wi-Fi and switch the Airplane Mode on.
- Switch on Airplane Mode on an Android Device: Swipe down from the top of the screen and click the airplane icon. Or go to Settings -> Connections and turn on the Flight mode.
7. Creating a Collection of Saved Posts
Additionally, you can view all the posts that you have liked as Instagram has an option for saving or bookmarking the posts.
This can be done by going to your profile and tapping the Settings icon at the top-right of your screen and then select Saved.
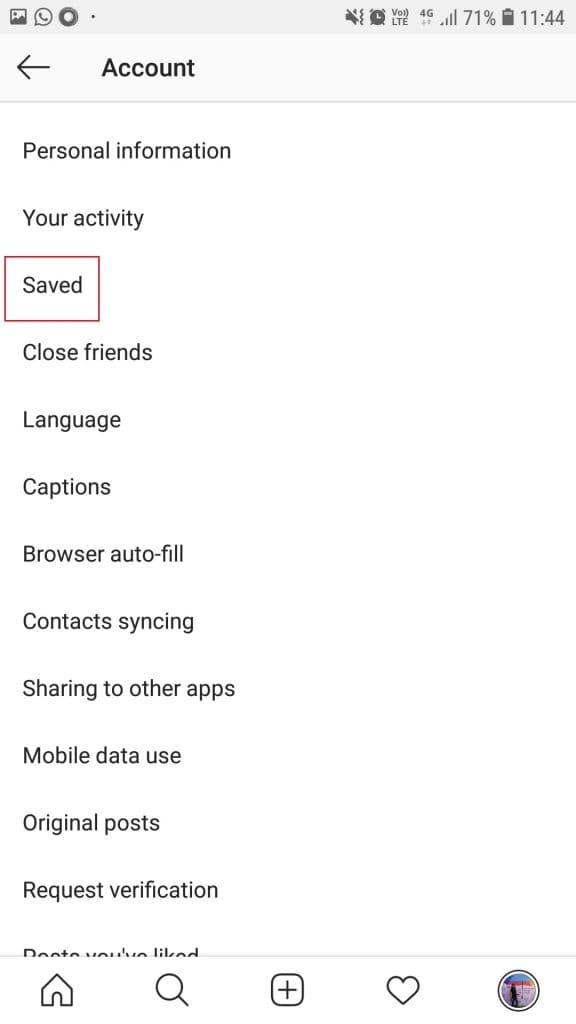
Then, click the “+” button and name your new Collection.
![]()
Now click on “Next”, and select images from your “Saved” section.
For saving photos for future collections, tap the bookmark icon below the post you want to save, as shown below:

Then, switch back to your saved photos by following the steps mentioned above.
The photos you have saved will get displayed and to add them to your Collection, select the Collection you want to add to (click on the three dots in the top right corner for Android) and tap “Add to Collection”.
Now, you can add any of your saved photos from here.
8. Scheduling Posts in Advance
Since Instagram is a mobile app, you routinely take photos and post them to your Story instantly. However, you can also pre-post or schedule from your desktop/laptop for a particular day and time in the future.
You can also find this feature with a social media scheduling tool if you have an Instagram business account. If you have a business profile, you can easily switch to it via the Instagram mobile app and follow the prompts for connecting it to Facebook.
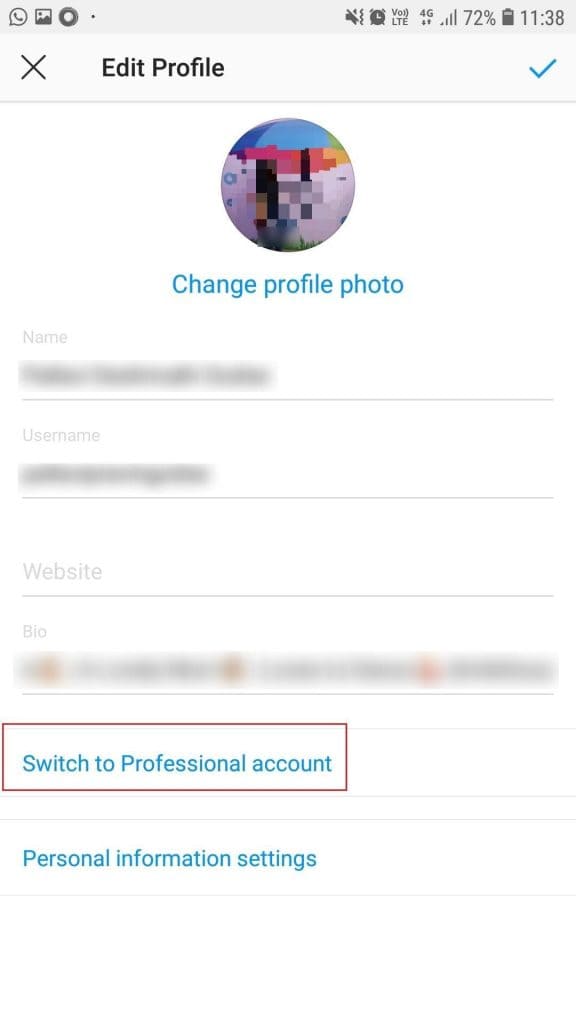
Based on the social scheduling tool you use, you might not include this step. After toggling to the right account, however, you’ll launch your scheduling tool, go to your current connected profiles, and see Instagram as an available integration.
9. Adding and Managing Multiple Accounts from the Same Device
Want to have a separate account for your blog? You can add and manage it right alongside your personal account. Check the below steps:
- From your profile, click the gear icon. On an Android device, first, tap the three horizontal lines to the top right of your screen.
- Scroll down to the bottom and click on “Add Account”.
- Add your other account with the username and password, and that’s it.
You can toggle between both profiles by holding down your profile picture in the navigation bar to see all connected accounts. Switching to a different account can be done through the Settings page mentioned earlier.
10. Enhancing your Instagram Bio to Get Displayed on the Explore Page
Your first group of Instagram followers might include your family, friends, and coworkers. But you need to grow your audience apart from the people that you already know. You can grow your audience by getting your profile displayed on the Explore page of Instagram.
![]()
The Explore page icon is a magnifying glass located at the bottom of your Instagram besides the home icon. It is a browsing page where you can find an Instagram profile with a topic or keyword. It includes posts from “Style”, “Fitness”, “Technology”, etc.
When you use the hashtags of these words in your posts, your content can get exposed to the people browsing such topics. However, you can promote your profile by using them in your Instagram name and bio.
For example, if Kim Walter is a chef, she can use “Chef Kim Walter” instead of simply using “Kim Walter”. Then she can include all her specialties in her bio such as “Italian”, “Continental”, “seafood”, etc.
11. Upgrading your Instagram Stories Using ‘Type Mode’
With the Instagram Stories feature, you can post momentary photos that get displayed separately from your profile and only last for 24 hours. It acts as a great functionality for users with similar interests to discover your profile on Instagram’s homepage.
But now Stories have improved in terms of creativity and so you need to use a good filter to stand unique to your audience. Similar to Snapchat, enter “Type Mode” for captioning your Story that needs more content. For this follow the below steps:
- Swipe right from your Instagram feed to go to Instagram Stories. With this, your smartphone camera will get launched. Then, click a photo or record a video and press the “Aa” icon to the top-right of your screen, as shown below:
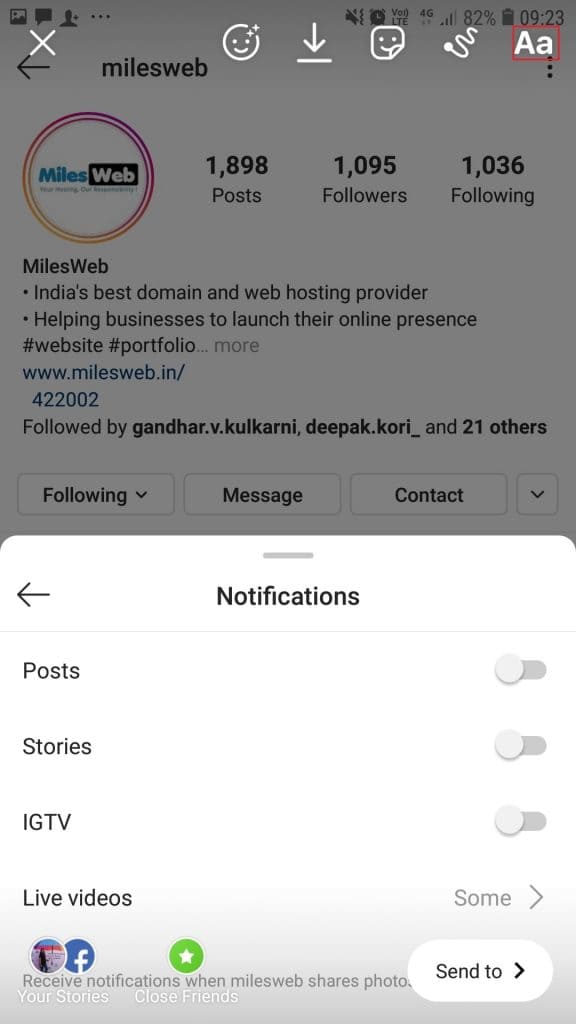 2. This will activate the Type Mode, where you can select from the five fonts: Modern, Neon, Typewriter, Strong, and Classic
12. Posting Content from Other Users to Your Instagram Story
No doubt Instagram Stories are a great way to expose content on your followers’ homepages but you might not always have something to share in your Story. So, you can share an inspiring post from someone else in your Instagram Stories as below:
- Search for a post you want to share in your Instagram Stories and tap the paper airplane icon, as shown below:
- This will open a screen displaying a list of your followers and you can select specific followers to whom you want to send this post or add it to your Story. Tap the second option, as shown below.
After this, your post will automatically turn into an Instagram Story that can be edited and designed as per your liking the same way you would any other Instagram Story.
Related: 10 Smart Ways To Promote Your Business Through Instagram Stories
13. Creating Stories Highlights to Display Stories for More Than a Day
Your Instagram story is available only for 24 hours for your followers. Sometimes, you might have a story that you want to display for more than a day.
This is where Stories Highlights can be used. This feature by Instagram allows you to save stories together in one space on your profile page. Wondering what that “New” button with the “+” icon below your profile image is? Here’s an explanation for it.
For creating a Stories Highlight, tap this New option and select any number of past stories in your album:

Now, add a cover photo and a name for displaying its own Instagram Story on your profile page. Stories Highlights can be removed when you want to by tapping and holding down this story.
14. Uploading and Browsing Video Content on IGTV
IGTV is one of the biggest features of Instagram and it can be assumed that it stands for “Instagram TV”. Basically, it is an Explore page for video content posted by users. The key benefits of IGTV are that you can upload videos of more than 60 seconds long, and also create your own channel with a video series that can be screened on other video platforms such as YouTube.
You can check the IGTV by going to your Explore page and selecting “IGTV” at the top as in the above image. A page will get displayed featuring videos and topics by active IGTV video creators on the platform.

Once you start viewing more videos, the topics explored by you on the IGTV will start adapting to your interests and display more content focusing on those. The same thing is applicable for your target audience too.
Tap the “+” icon to the top right of your screen for creating an IGTV channel as below:

After creating an IGTV channel, you can upload videos right from your smartphone’s camera roll to your channel.
15. Hiding, Deleting, or Disabling Comments on Your Posts
Twitter allows users to comment on the Tweets and you don’t the control over it. But Instagram is your domain and give you the power to control comments on your content. This feature is important for managing business accounts.
Filtering Comments by Keyword:
In the Instagram app on your mobile, go to “Options” and select “Comments”. From here, you can toggle on “Hide Inappropriate Comments” and also enter specific keywords that you want the app to control within each comment.
Deleting Comments:
For deleting comments, tap the speech bubble icon below the post, and swipe lightly to the left, over a comment. Then click on the garbage can icon that appears to delete the comment. This can be done with your comments too.
Disabling Comments Completely:
Note that you can’t turn off comments across your complete profile. You can only disable them for particular posts.
For this, post an image on which you don’t want anyone to comment. When you go to add a caption, tags, and location, tap “Advanced Settings” at the bottom. A screen will get displayed where you will easily find an option labeled “Turn Off Commenting”, just turn it on.
Summary
Hope that you will be able to use these Instagram hack to manage your account. Though I am concluding it here, there are some more hacks that will be shared. So, stay tuned for more hacks, and let us know if you found these hacks useful.

