It is said, if you are looking for an efficient, elegant and well-architect content management system, then WordPress is absolutely for you. It is a personal publishing system that is built on PHP and MySQL usually used with MySQL or MariaDB database servers but, it is also SQLite database engine friendly. It is licensed under GPL and is an official successor of b2/cafelog.
Amazing features like, best free WordPress themes, plugin architecture and a template system makes WordPress favorite among bloggers community as it also supports other forms of web content that includes more traditional mailing lists and forums, online stores and media galleries as well.
WordPress powers 26% of the web, has more than 60 million active websites that include 33.6% of the top 10 million websites like The Obama Foundation, Angry Birds, Sony Music, BBC America, etc. as of April 2019.
So what are you waiting for?
If you want to create a website, say YES to WordPress.
In general, to create any form of a website, you first need to decide its theme. The theme is what your website would look like, always remember – more eye-appealing theme grabs more visitors. In WordPress, you have various default themes to choose from and in this article, we will see all of them.
-
- Progress of Default WordPress Themes :
- Progress of Default WordPress Themes :
# What is the default WordPress theme?
WordPress offers some default themes to display on the front end of the website. This will be the first theme that you will view when you first install WordPress.
Default WordPress themes are created keeping in mind to showcase the features of WordPress, that’s what makes it feature-rich as can be used to create a website.
Default WordPress theme is actually a saver!
In case, a user’s installed theme gets deleted or something goes wrong with it, then WordPress automatically falls back to the default theme.
# Importance of a WordPress Theme
It is observed that most of the people do not consider the theme as an important parameter for their WordPress site. This means they are not aware of the wonders a theme can do for a website or they don’t know how to use themes to their best. Following points explain the importance of WordPress theme :
1) Makes the Website Attractive
WordPress themes are blessings to those who are not experts in website designing. Any novice in this sector can use several WordPress themes available because it provides easy drag and drop options to develop websites. Thus, you can make an attractive website as you have planned.
These themes are bifurcated according to domains and you can choose the one that suits your business. This saves efforts of customization and design planning.
2) Supports Multiple Websites
It is easy to get hands-on such theme that supports multiple websites at the same time. This quality of WordPress theme saves you from overspending to buy different individual themes when you are willing to get multiple websites developed.
3) Enhances Functionality
Whenever people rely on WordPress, they always consider a query of how they can manage plugins to make their website more efficient and responsible. In such cases, the type of plugins you are installing and the way you regulate your website depends completely on the type of theme that you are selecting. One wrong selection can mess up the website and its design. Thus, themes are considered as an important part in helping you install plugins.
4) Provides Faster Results
This is the significant reason to select a WordPress theme because the importance of themes is not only limited to providing user-friendly features or being cheaper but also helping you build a website faster as well. If you require a website on an urgent basis, then WordPress theme comes as a helping hand to you. And the good news is, themes also comes with a demo.
5) Keeps the Website Up To The Standards
We all are aware of the unpredictable changes occurring on the internet, every now and then. That’s why even WordPress is improving with each passing day, which ensures that even the major changes happening all around the world, won’t let you lag.
WordPress themes keep alerting you about the updates so that you can upgrade it as soon as the new version releases. This protects you to survive in the cut-throat competition. With the new updates, you not only keep your website up to the standards but also add several new useful features.
6) Provides Premium Quality
WordPress themes don’t compromise on the quality parameter. All these themes are so well coded that it is very difficult to encounter any error in the code. WordPress themes are always tested by skillful professionals that ensure of providing error-free experience to the users.
Also, some of the themes come with well-organized and SEO optimized code that allows your site to get noticed by search engines easily.
7) Adds Beneficial Features
WordPress theme has many premium features that understand not every user is a tech-savvy and can edit the code whenever required. Thus, you can choose a WordPress theme to create a professional website from the massive collection of features and functionalities.
Additionally, there are some themes that make you free of resource-hogging plugins, because they do most of the things for you. Such themes save your time from research, installation, and plugin management just to cover your website’s basic needs.
8) Supports Browser Easily
Whenever you create a website, you obviously develop it from the customer’s point of view, isn’t it? Thus, you need to keep in mind the variation of browsers used by your customers. In case you fail to create a website that supports different browsers, then you will end up losing a large number of customers. Thus to provide the superior visitor experience, WordPress themes help to the core extent by supporting multiple browsers.
Now, you might have understood the importance of WordPress themes for your site.
Ready to develop a WordPress theme?
# This short step by step tutorial will guide you to develop a WordPress theme.
WordPress theme allows you to do to everything without having the knowledge of code that powers it.
Let’s get started with the WordPress Themes Development :
Step 1: Create a folder for your theme files
Step 2: Create style.css and index.php in your created theme folder
Step 3: Activate your custom theme from the WordPress Dashboard
Step 4: Add a code to Output The Post Title and Post Text
Step 5: Add a link to Each Post
Step 6: Add Header and Footer to your Custom Theme
Step 7: Add a functions.php file to your theme
Step 8: Add Style to theme
Develop now :
Step 1: Create a folder for your theme files
After downloading WordPress, you may consider creating a theme. Whenever we create themes, we must know where the files that are used to make up a WordPress theme live in a WordPress Installation. As we know that a WordPress installation has a root directory named as wordpress, here is a view of how it looks :

In this directory folders are :
- wp-admin
- wp-content
- wp-includes
Rest all are files.
We will talk about the wp-content folder. The wp-content folder incorporates another folder named as themes. Themes folder holds one or more themes that you are likely to use with your WordPress website. Within this folder, there are three additional folders called as twentynineteen, twentyseventeen and twentysixteen, and these folders contain three default WordPress themes. You can see in the below image, there is one more folder called as customtheme.

Create this folder too, in your installation as this is the place where you will create your WordPress theme right from scratch.
Step 2: Create style.css and index.php in your created theme folder
Once you have created a new folder named customtheme in the themes folder, you need to create two empty files in the directory. These files are index.php and style.css

Add minimum requirements to these files to get a new theme on WordPress.
style.css
In style.css you must add specific information about the theme that you are building. WordPress reads all the comments mentioned in the style.css file. It also controls the presentation (visual design and layout) of the website pages.
This example simply assigns a Theme Name, the Author, the Author URI, and the Version number of the theme.
/*

Theme Name: customtheme

Author: MilesWeb

Author URI: https://milesweb.com

Version: 1.0

 */
index.php
In this file, you just have to output something to the screen to ensure that your custom theme is working properly.
<h1>Custom Theme!</h1>
Hurray!
You have just created your first WordPress theme.
Step 3: Activate your custom theme from the WordPress Dashboard
Now, you can easily visit your WordPress Dashboard and navigate to Appearance -> Themes and you can see the new theme that has been created.
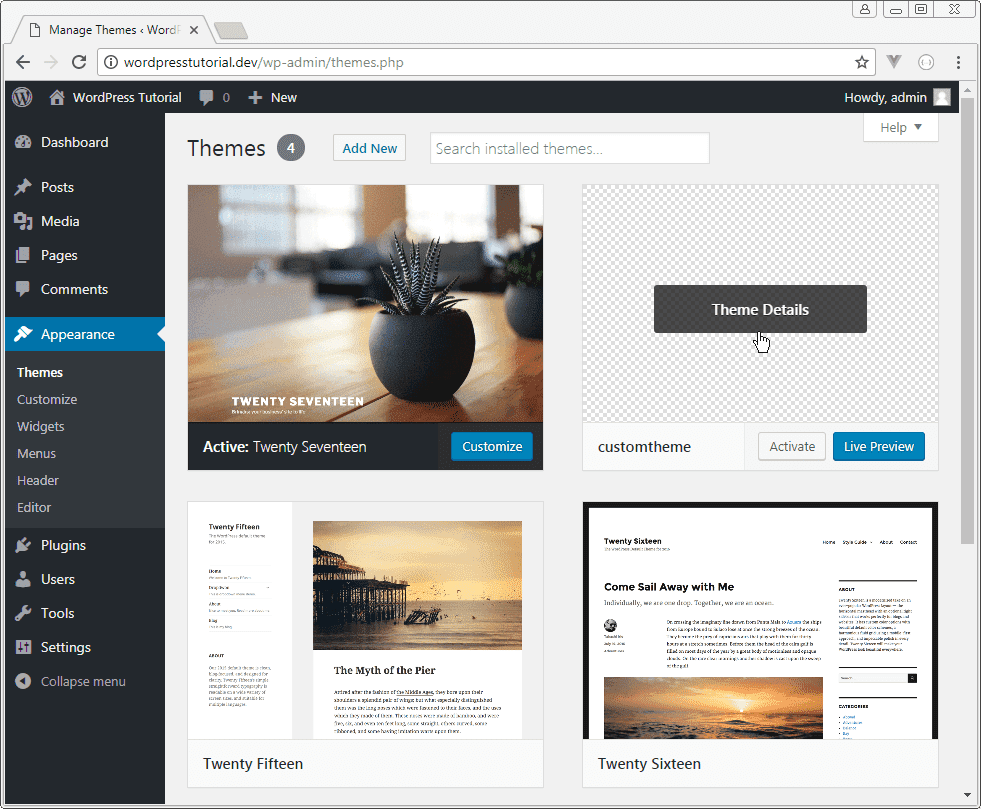
Click on “Theme Details” on your custom theme and notice if the information that you have entered in the style.css file works. Observe that the theme has a name customtheme with version 1.0, by the author MilesWeb and a link to the URI provided.
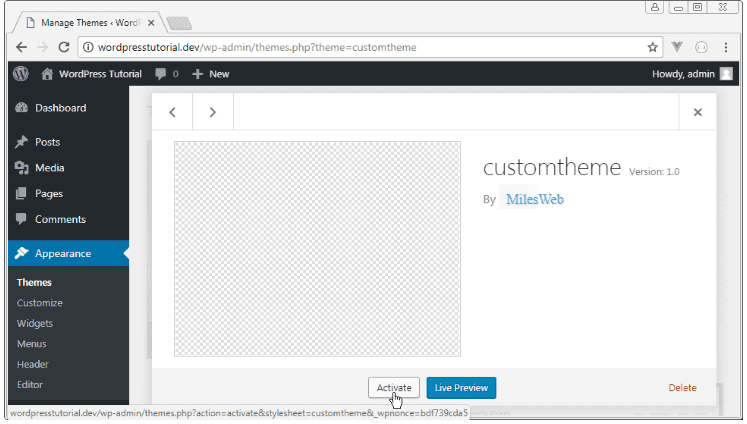
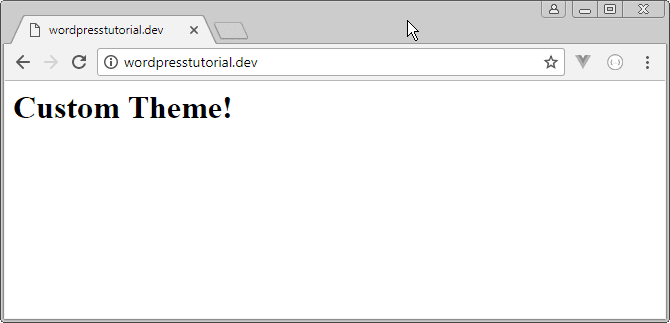
Click Activate on the new customtheme and then visit the site.
Step 4: Add a code to Output The Post Title and Post Text
After performing all the above steps, the theme outputs only Custom Theme to the page, when anyone visits your site, regardless of the number of posts that are present in the database. Now let’s move forward by knowing how to fetch some data from the database and output it to the required page. To fetch the Post Title and Post Content of all pages, and view them on the homepage, follow the steps provided below. First, check out what you have for posts in the WordPress Dashboard.

Extending The WordPress Loop
WordPress Loop keeps WordPress running. This loop allows you to check for the posts and display them on the page as per your requirements. If your database has posts then loop over them, even when there are still posts, otherwise, users will think that there are no posts available. PHP code for it is :
<?php


if ( have_posts() ) :

               while ( have_posts() ) : the_post(); ?>


               <?php endwhile;


else :

               echo '<p>There are no posts!</p>';


endif;


?>
Notice that we have used two functions in this loop.
(i) have_posts(): this function tells you if there are any posts in the database to loop over. It returns a true or false value, where true indicates that there are posts available to loop over. Whereas, false indicates there are no posts available to loop over.
(ii) the_post(): this function’s job is just to get WordPress ready to output posts. It doesn’t return any value, instead, it retrieves the next post, sets up the post, sets the in_the_loop property to true.
As per the steps explained you still don’t get any output information about the blog, but you can update it now in your index.php file :
<?php

if ( have_posts() ) :

               while ( have_posts() ) : the_post(); ?>

  <h2><?php the_title() ?></h2>

                               <?php the_content() ?>

                    <?php endwhile;

else :

               echo '<p>There are no posts!</p>';

endif;

?>
Now, you can see two additional functions have been used.
(i) the_title(): this function will output the title of the post to the page.
(ii) the_content(): this function will output the body of that post to the page.
On the next loop, these functions are capable of again fetching the next title and content and output them to the page.
Step 5: Add a link to Each Post
It is always a better idea, to link each post, to view all of them by their own instead of just treating them as a part of the homepage. To do this, you need to use another function provided by WordPress and is named as the_permalink() in your index.php file:
<?php

if ( have_posts() ) :

               while ( have_posts() ) : the_post(); ?>

        <h2><a href="<?php the_permalink() ?>"><?php the_title() ?></a></h2>

                               <?php the_content() ?>

               <?php endwhile;

else :

               echo '<p>There are no posts!</p>';

endif;

?>
Now, you will be able to click on each post title and navigate to that page easily.
Step 6: Add Header and Footer to your Custom Theme
Header and Footer section in your theme is as important as Title and Post Content, as these sections contain content that is always seen on all pages of the website. Header and Footer sections come above and below the post content respectively. Again to use them, you need to call functions to your theme file on the page as per your requirements. Here we have added it in index.php file:
<?php

get_header();

if ( have_posts() ) :

               while ( have_posts() ) : the_post(); ?>

        <h2><a href="<?php the_permalink() ?>"><?php the_title() ?></a></h2>

                               <?php the_content() ?

               <?php endwhile;

else :

               echo '<p>There are no posts!</p>';

endif;

get_footer();

?>
Functions called are :
(i) get_header()
(ii) get_footer()
Well done!

You can now create a customized header and footer for your web pages. Both header.php and footer.php file should be in customtheme folder. The content that you want to show on this web page will be displayed between these two functions.
# Link site title to the homepage
Most of the themes allow you to click on the title text of any webpage so that it will redirect to the homepage of the site. Add the link in header.php
<!DOCTYPE html>

<html <?php language_attributes(); ?>>

<head>

    <meta charset="<?php bloginfo( 'charset' ); ?>">

    <title><?php bloginfo( 'name' ); ?></title>

               <?php wp_head() ?>

</head>

<body <?php body_class(); ?>>

<header class="site-header">

    <h1><a href="<?php echo home_url(); ?>"><?php bloginfo( 'name' ); ?></a></h1>

    <h4><?php bloginfo( 'description' ); ?></h4>

</header>
As an example we have used bloginfo() function passing parameters of name bloginfo( ‘name’ ) and description bloginfo( ‘description’ ).
Step 7: Add a functions.php file to your theme
As of now, we have used four files in our custom theme namely index.php, style.css, header.php, and footer.php. The next important file that we will use is functions.php file.
A functions.php file is a place where you keep the code to modify the default behavior of WordPress. Some key points about this file are :
- It doesn’t require unique Header text.
- It is stored in the folder that contains your theme files.
- It can be executed only when it is present in the currently activated theme’s directory.
- It can be applied only to the current theme.
- It can call PHP functions, WordPress functions, or custom functions.
To give better style to the theme you need to create a function in your functions.php file and include it to the style.css file into your theme. Add following code in functions.php file :
<?php

function custom_theme_assets() {

               wp_enqueue_style( 'style', get_stylesheet_uri() );

}

add_action( 'wp_enqueue_scripts', 'custom_theme_assets' );
This code will activate the stylesheet of your custom theme.
Step 8: Add Style to theme
After all these efforts you must want your site to look pretty, isn’t it? Then for this let’s give finishing to the theme by adding wrapping <div> with a class of container. Place opening <div> in the header.php and closing <div> in footer.php. Also, you shall wrap the post output in index.php with a <article> tag that has a class of post.
Code to add opening <div> to the header.php file :
<!DOCTYPE html>

<html <?php language_attributes(); ?>>

<head>

    <meta charset="<?php bloginfo( 'charset' ); ?>">

    <title><?php bloginfo( 'name' ); ?></title>

               <?php wp_head() ?>

</head>

<body <?php body_class(); ?>>

<div class="container">

    <header class="site-header">

        <h1><a href="<?php echo home_url(); ?>"><?php bloginfo( 'name' ); ?></a></h1>

        <h4><?php bloginfo( 'description' ); ?></h4>

    </header>
Code to add closing </div> to the footer.php file :
<footer class="site-footer">

    <p><?php bloginfo( 'name' ) ?></p>

</footer>

</div> <!-- closes <div class=container"> -->

<?php wp_footer() ?>

</body>

</html>
Code to wrap the post output with an <article> tag to the index.php file (on a page where you want to display post) :
<?php

get_header();

if ( have_posts() ) :

               while ( have_posts() ) : the_post(); ?>

        <article class="post">

            <h2><a href="<?php the_permalink() ?>"><?php the_title() ?></a></h2>

                                               <?php the_content() ?>

        </article>

               <?php endwhile;

else :

               echo '<p>There are no posts!</p>';

endif;

get_footer();

?>
Hola!

That’s it. You have just developed a WordPress theme of your choice. For any modification as per your requirements, you can play in style.css file.
Related: 10 Easy Ways to Speed up your WordPress in 2019
Progress of default WordPress themes
WordPress has been around for more than a decade and a half now, and a lot of changes have been done to its features. Similarly, there’s been a lot of improvisation in WordPress themes since it first released in 2003.
The first WordPress theme was created by Matt Mullenweg in the year 2003 when WordPress was released. During this time, the users didn’t have the authority to switch the themes.
After the original theme, then came the WordPress Classic Theme with WordPress 1.2. After the release of the Kubrick theme with WordPress 1.5, users were given the ability to switch themes. Still, Kubrick ruled as the default WordPress theme, until TwentyTen in WordPress 3.0 took over it.
From the year 2010 the WordPress team every year comes out with a stunning new default theme, that is named after the year. TwentyTwenty is the most recent one.
We will now see all the default WordPress themes, their features and how they all have developed.
Let’s begin!
The default WordPress themes : As of now, 2019, there are total 11 default WordPress themes released and 12th one is about to release. Let’s see each of them according to their releases :
1) Classic –

Classic was considered as a default theme, before the release of WordPress 1.5. During the first year of WordPress, this theme was used by bloggers as it had efficient style and functionalities.
In early days, WordPress was not a full-fledged Content Management System as it is now, and the design was completely intended for the blogging solution. For example on the sidebar, it had a feature that would stick around for many years (and themes) to come. The sidebar had a blogroll maintained with the Links Manager, which made all the recent posts easily accessible for the readers, which ultimately helped bloggers to promote their content. Classic also allowed the use of sticky posts, so that bloggers could highlight the important content on their site.

Brief about Classic Theme :
- New in this theme: The theme had a sidebar, link manager, blogroll and sticky posts.
- Primary agenda of a theme: To enhance the blogging experience and make it very easy to promote content through sidebar blogroll.
- Mobile Support: No mobile support.
- Customizable features: No customizable features. But, can be done manually with the coding.
2) Default – known as the Original WordPress theme

Default theme was designed by Michael Heilemann and was declared as the default theme in 2005. It was popularly known as Kubrick and also considered as the first official default theme that features a memorable and traditional design.
Till today, clean and clear text on the website is considered as a foremost priority and default provided the same, with its navigable sidebar and streamlined nature. Its Sans Serif typography ruled as an appealing design element even after 10 years of its release.
Default theme brought the choice of visual information for its users for the first time. Users could also use templates, which can be broken up into sections that could be altered independently. Users were happy to get customized features like headers, footers, and sidebars.

Brief about Default theme –
- In WordPress version: 1.5 by default
- New in this theme: features like Template tags, plugin integration, full widget support (WordPress 2.2)
- Primary agenda of the theme: To showcase the new system design and to implement more user-friendly designs.
- Mobile Support: No mobile support.
- Customizable Features: Template files that allowed to customize headers, footers, and sidebars.
3) Twenty Ten – launched on June 17, 2010

Twenty Ten came along with WordPress 3.0. This theme was the first to allow implementing some of the design features on the front and back ends that are now very popular among WordPress users.
By that time, due to the tremendous demand WordPress was shifting its focus from only blogging to become a true CMS. This difference can be seen between Default and Twenty Ten. For example, a now-familiar black menu bar was added, which encouraged the use of multiple pages, as opposed to just a simple blog archive. The customizable features also helped users to create any type of websites as per their requirements, instead of just driving them towards blogging.
Additionally, the introduction of visual editor made it easy for users of all skill levels to create a site that can work for them. This allowed WordPress users to view how the front end of their site would look and can simultaneously perform content editing.

Brief about Twenty Ten theme –
- In WordPress version: 3.0 by default
- New in this theme: Features like custom backgrounds and headers, navigation menus, featured images, multiple widget areas, post formats (WordPress 3.1) and the visual editor.
- Primary agenda of the theme: To convert WordPress into a full-fledged CMS from just a blogging platform and also to expand user’s customization capabilities without the knowledge of coding.
- Mobile Support: No mobile support.
- Customizable Features: Six widget areas, backgrounds, headers, footers, sidebars, menus, images (including header images).
4) Twenty Eleven – launched on July 4, 2011
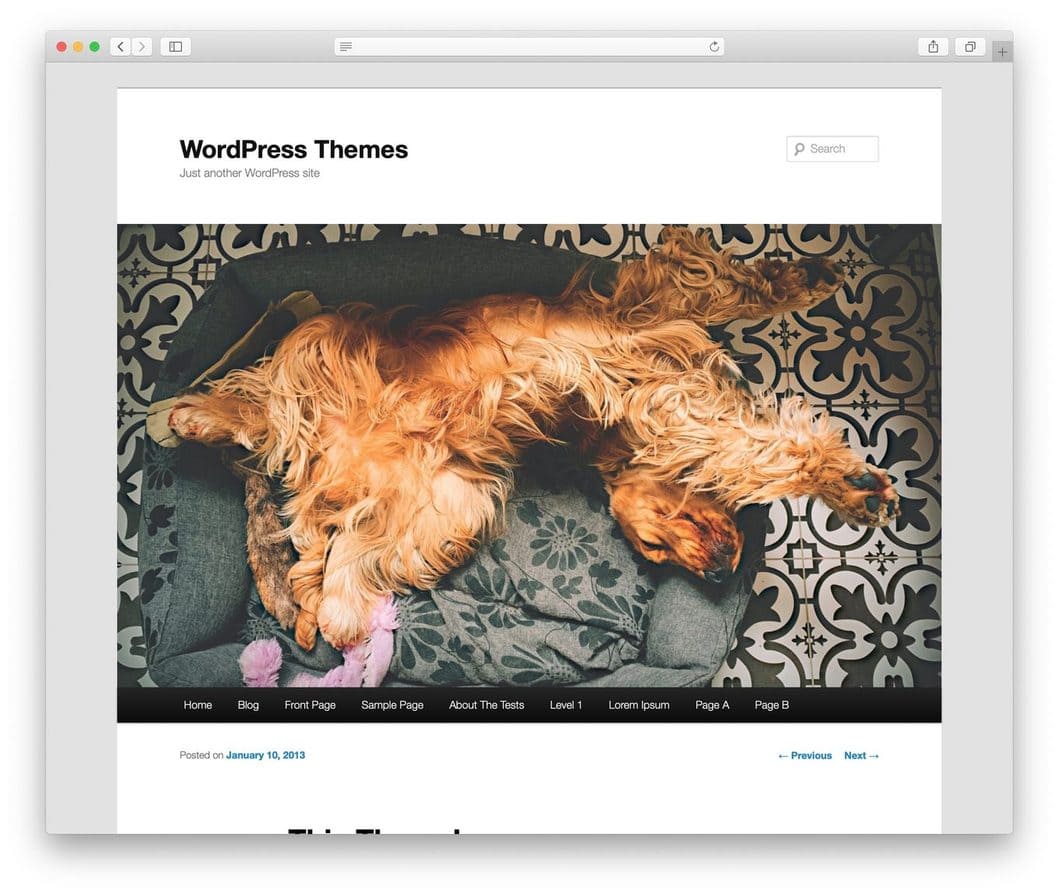
Twenty Eleven came into existence 1 year after its predecessor which started the trend of a new release every year. Instead of trying to introduce new design features, it focused mainly on improvising the features already introduced in Twenty Ten and helped to expand WordPress’ customization capabilities.
Twenty Eleven kept the hold on the black menu bar and enhanced its style with a clean, large, Sans Serif font. Color customization was the first default WordPress theme to offer this service.
Here’s a sample of Twenty-Eleven page :

Brief about Twenty Eleven theme –
- In WordPress version: 3.2 by default.
- New in this theme: Features like custom color and randomized headers.
- Primary agenda of the theme: To enhance the features introduced in Twenty Ten.
- Mobile Support: Can be adaptable for mobiles, but was not recommended as-is.
- Customizable Features: Randomized headers and customized colors.

5) Twenty Twelve – launched on December 11, 2012
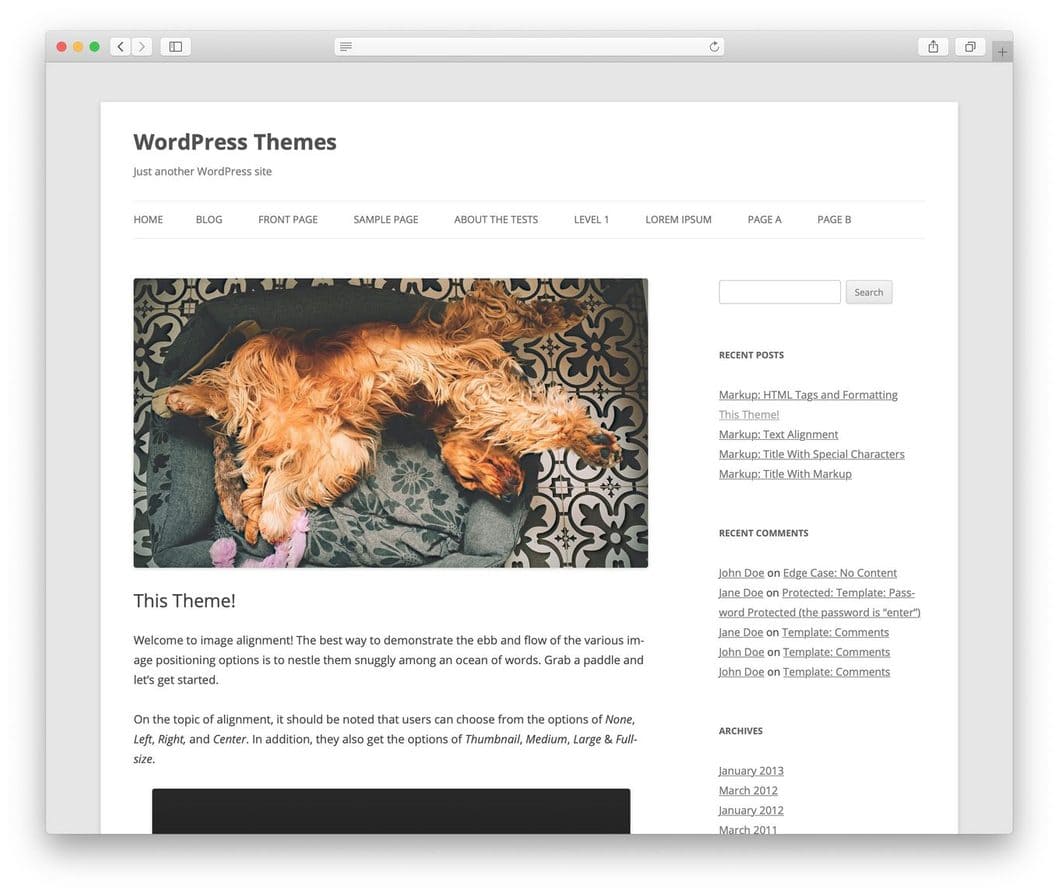
The default WordPress theme that responded correctly to the rise of internet usage. Twenty Twelve was the first default WordPress theme that included the basic mobile responsiveness as a prime feature.
Twenty Twelve was created by scaling the design that made it simple to use the theme on mobile phones. It also featured Sans Serif typography and minimalist design. In Twenty Ten and Twenty Eleven, the header image was showing outstanding performance, but it has become an optional feature in Twenty Twelve, with the default settings leaving it turned off.
Also, this theme took a forward step towards developing WordPress as a CMS. To do so, it included a static home page template that focused its users from blog posts towards a more traditional website setup. The sidebar which was once considered as a key WordPress design feature was made optional and the blogroll by default was kept hidden.
The Customizer was also released in 2012 that made easier for users to create unique sites. Users were now able to preview changes to color schemes, custom headers and backgrounds, and other features before making them live.

Brief about Twenty Twelve theme –
- In WordPress version: 3.5 by default
- New in this theme: Features like mobile responsiveness, homepage template, and the customizer.
- Primary agenda of the theme: To introduce mobile responsiveness to WordPress default theme, and continue improvisation in converting WordPress as CMS.
- Mobile Support: Yes, can support mobile.
- Customizable Features: Option to remove the sidebar and a static homepage template.

6) Twenty Thirteen – launched on August 1, 2013

Twenty Thirteen came with the new zeal that replaced the cleanlines of earlier themes with a default Serif font and a more intricate color scheme. This gave the theme more fun rich appearance which was something new compared to the other WordPress themes. This theme provides extensive customization option to users to enjoy more flexibility when building their sites and also while adapting WordPress to their needs. The primary widget area has also been moved from the sidebar to the footer.
Twenty Twelve didn’t add any enhanced feature rather than just been accessible on mobile devices. Whereas, Twenty Thirteen offered managed customization options without sacrificing its mobile responsiveness characteristic.
Even after these major advancement in the designs, Twenty Thirteen returned to WordPress’ roots and brought blogging back into the limelight. Post format integration had a major focus on the new theme, which gave more options to users to create content.

Brief about Twenty Thirteen theme –
- In WordPress version: 3.6 by default
- New in this theme: Improved post formats feature.
- Primary agenda of the theme: To bring blogging back in focus and improve the post format integration.
- Mobile Support: Yes, can support mobile.
- Customizable Features: Additional post formats.

7) Twenty Fourteen – launched on December 12, 2013
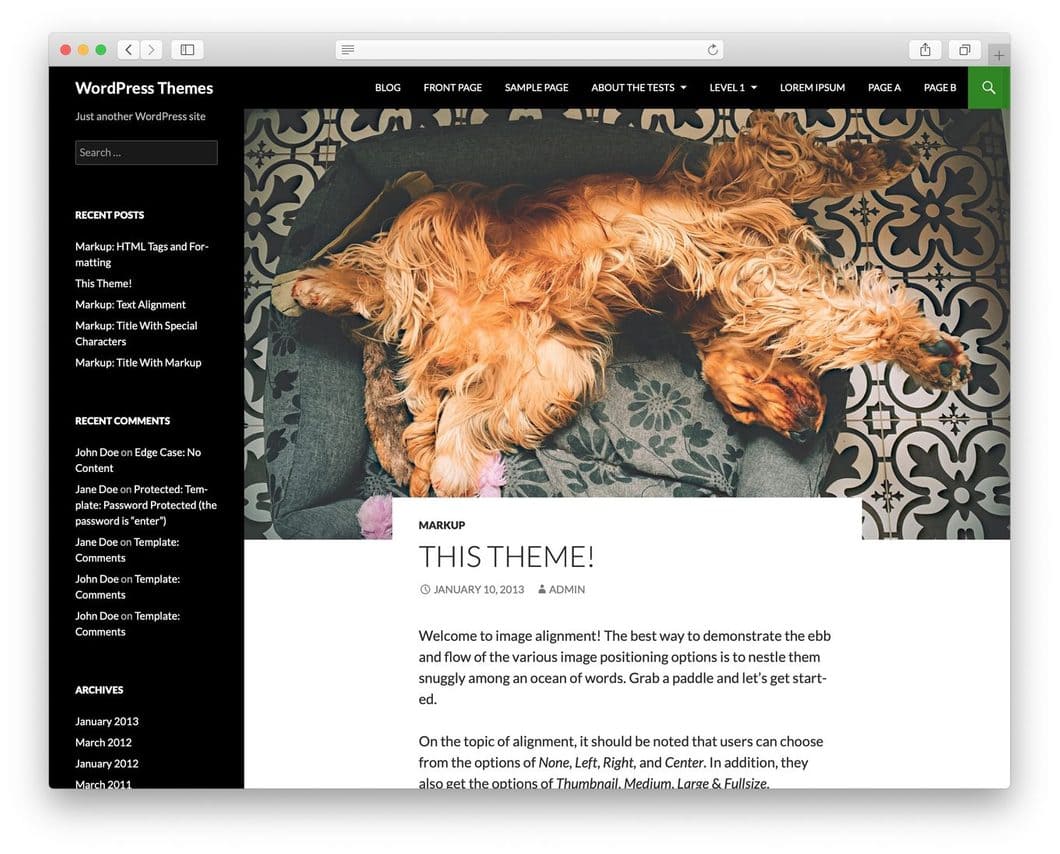
With Twenty Fourteen theme WordPress first time advertised itself as something different and more than a generic blog theme. It is a ‘magazine-style’ layout focused mostly on featured images and also offered additional display options with content grids and sliders. This theme is a perfect example of how WordPress has kept pace with changes in the role and use of websites. The blog has evolved into a multi-author platform, to cope up with this WordPress also adapted its default theme to show how people were using the software.
Twenty Fourteen’s typography and color scheme mainly focused on readability and the ease of browsing. Also, it has optional sidebar widgets those provided easy navigation to the latest posts, recent comments, blog posts archives, and post categories, recalling WordPress’ original sidebar.

Brief about Twenty Fourteen theme –
- In WordPress version: 3.8 by default.
- New in this theme: Features like content grids and sliders, collapsible menus and movable sidebars for mobile, authors widget, featured content and contributors page template.
- Primary agenda of the theme: To make general advancements and provide additional features, and to demonstrate WordPress’ capability/capacity as a multi-author platform.
- Mobile Support: Yes, supports mobile.
- Customizable Features: An authors widget, featured content, accent colors, a contributors page.

8) Twenty Fifteen – launched on December 18, 2014

Twenty Fifteen was developed by Takashi Irie by keeping simplicity in mind, returning to the simple style of the earlier default WordPress themes. It offered various color scheme options which are easily accessible for users through the Customizer.
Does the simplistic design of Twenty Fifteen, made it a plain theme?
Not at all.
Instead, it offers a default font that brings a little more to the design themes than the Sans Serif font of Twenty Fourteen. The theme allowed adding visual interest to the clean layout, and it also adapts well to any alphabet, improving the theme’s translation capabilities.
Twenty Fifteen themes also enrich social media’s relationship to blog and other sites, by allowing its users to add social media icons to their menus. This made them easy to link different aspects of their brands together making it easy for the website visitors to redirect to their social media accounts.

Brief about Twenty Fifteen theme –
- In WordPress version: 4.1 by default
- New in this theme: Social icons/ redirecting to social media accounts.
- Primary agenda of the theme: To improve WordPress globally (internationalization), to enhance core customization capabilities, and to provide a mobile-first design.
- Mobile Support: Yes, supports mobile.
- Customizable Features: Social icons, additional color scheme options.

9) Twenty Sixteen – launched on December 8, 2015

Twenty Sixteen came with some improvised features those were equally important for bloggers and other site owners as well. The theme offered additional navigation to those who need it. In this theme, users can easily incorporate social icons to pages and posts. For the content focused users, it enables the stripping down of theme to the basics by removing the sidebar is quick and easy.
Twenty Sixteen offers ‘Content Bottom’ widget areas and pulls quotes. It enables users to add supplementary content to their posts that again shows us that WordPress responds to changes in web design trends and users’ needs.

Brief about Twenty Sixteen theme –
- In WordPress version: 4.4 by default
- New in this theme: Features like content bottom widget areas, post intros ( known as ‘Excerpts’), pull quotes.
- Primary agenda of the theme: To improve and modernize the traditional blog site and post design.
- Mobile Support: Yes, it supports mobile.
- Customizable Features: Pull quotes, excerpts, and content bottom widget areas.
10) Twenty Seventeen – launched on December 6, 2016

WordPress released a default theme at the end of 2016 that focused on sites that were not the blogs. Even though other default WordPress themes offered flexibility in layout and could be adapted to multiple purposes, content creation has always remained the prime focus. Whereas, Twenty Seventeen was embossed as a business site theme. It has layout and features that completely focuses on business site requirements, which still displays content amazingly. This makes it clear that the theme has other priorities.
To start with its stand out features, it is impossible to ignore header images for optimal site branding. Users are also allowed to replace those images with the videos to get better engagement and to attract visitors. Additionally, even by adding a video and an image, you still can guarantee that desktop and mobile users are able to view your media.
Twenty Seventeen has a front-page that enables its users to put a summary of their brand, just by gathering content from different pages on the site. Users have the freedom to customize sections that they want to show on their front page and also they can easily choose which web page to display.
Like Twenty Fifteen, this theme also has typography that offers various font options that are available in a variety of languages; this is an important development for the business sites. Due to the multi-language support, Twenty Seventeen got attention on the international market, that ensures to all the business owners that their sites are readable to all visitors/customers and clients, regardless of the location.

Brief about Twenty Seventeen theme –
- In WordPress version: 4.7 by default.
- New in this theme: Features like videos in the header, site logo, improved child theme functionality, and business-focused layouts.
- Primary agenda of the theme: To improve and optimize the use beyond blogging, and to show that WordPress is progressing towards CMS.
- Mobile Support: Yes, supports mobile.
- Customizable Features: Header image and video options, personalized logo, unique front page creation.

11) Twenty Nineteen – launched on December 6, 2018

Twenty Nineteen is the latest default WordPress theme that has been released. With the introduction of the new Block Editor, it can be seen that WordPress again turned back to minimalism and also renewed its focus on content creation.
The main feature of this theme is flexibility. Twenty Nineteen featured full Block Editor integration, and also offers more customization options than ever before. Still, the basic focus remained on offering streamlined typography, the new editor enables users to make their own sites. Also, Twenty Nineteen has profited from many other features those were developed for WordPress default themes over the years, including social media icons, widgets, and multi-language support. When the theme is combined with Block Editor, it can be used with any kind of website. Even the theme is completely responsive for all types of browsing.

Brief about Twenty Nineteen theme –
- In WordPress version: 5.0 by default
- New in this theme: Block Editor integration.
- Primary agenda of the theme: To work smoothly with Block Editor to create a highly visual publishing experience, and to focus the Block Editor’s functionality.
- Mobile Support: Yes, supports mobile.
- Customizable Features: Custom default blocks

12) Twenty Twenty – to be launched on November 12, 2019
Twenty Twenty is the latest default WordPress theme going to release with the latest WordPress 5.3. It is specially designed with a focus on Gutenberg, even though there’s a large difference between these two.

Twenty Twenty is created by Anders Noren, upon Chaplin – a free WordPress theme and is a default theme design lead of WordPress 5.3.
Chaplin – It is a feature-rich WordPress theme that gives its users full control over the fonts and colors of their site. Like the previous version, it is also built from the ground-up with the new Block Editor in mind and makes it easy for users to create good looking layouts on both posts and pages.
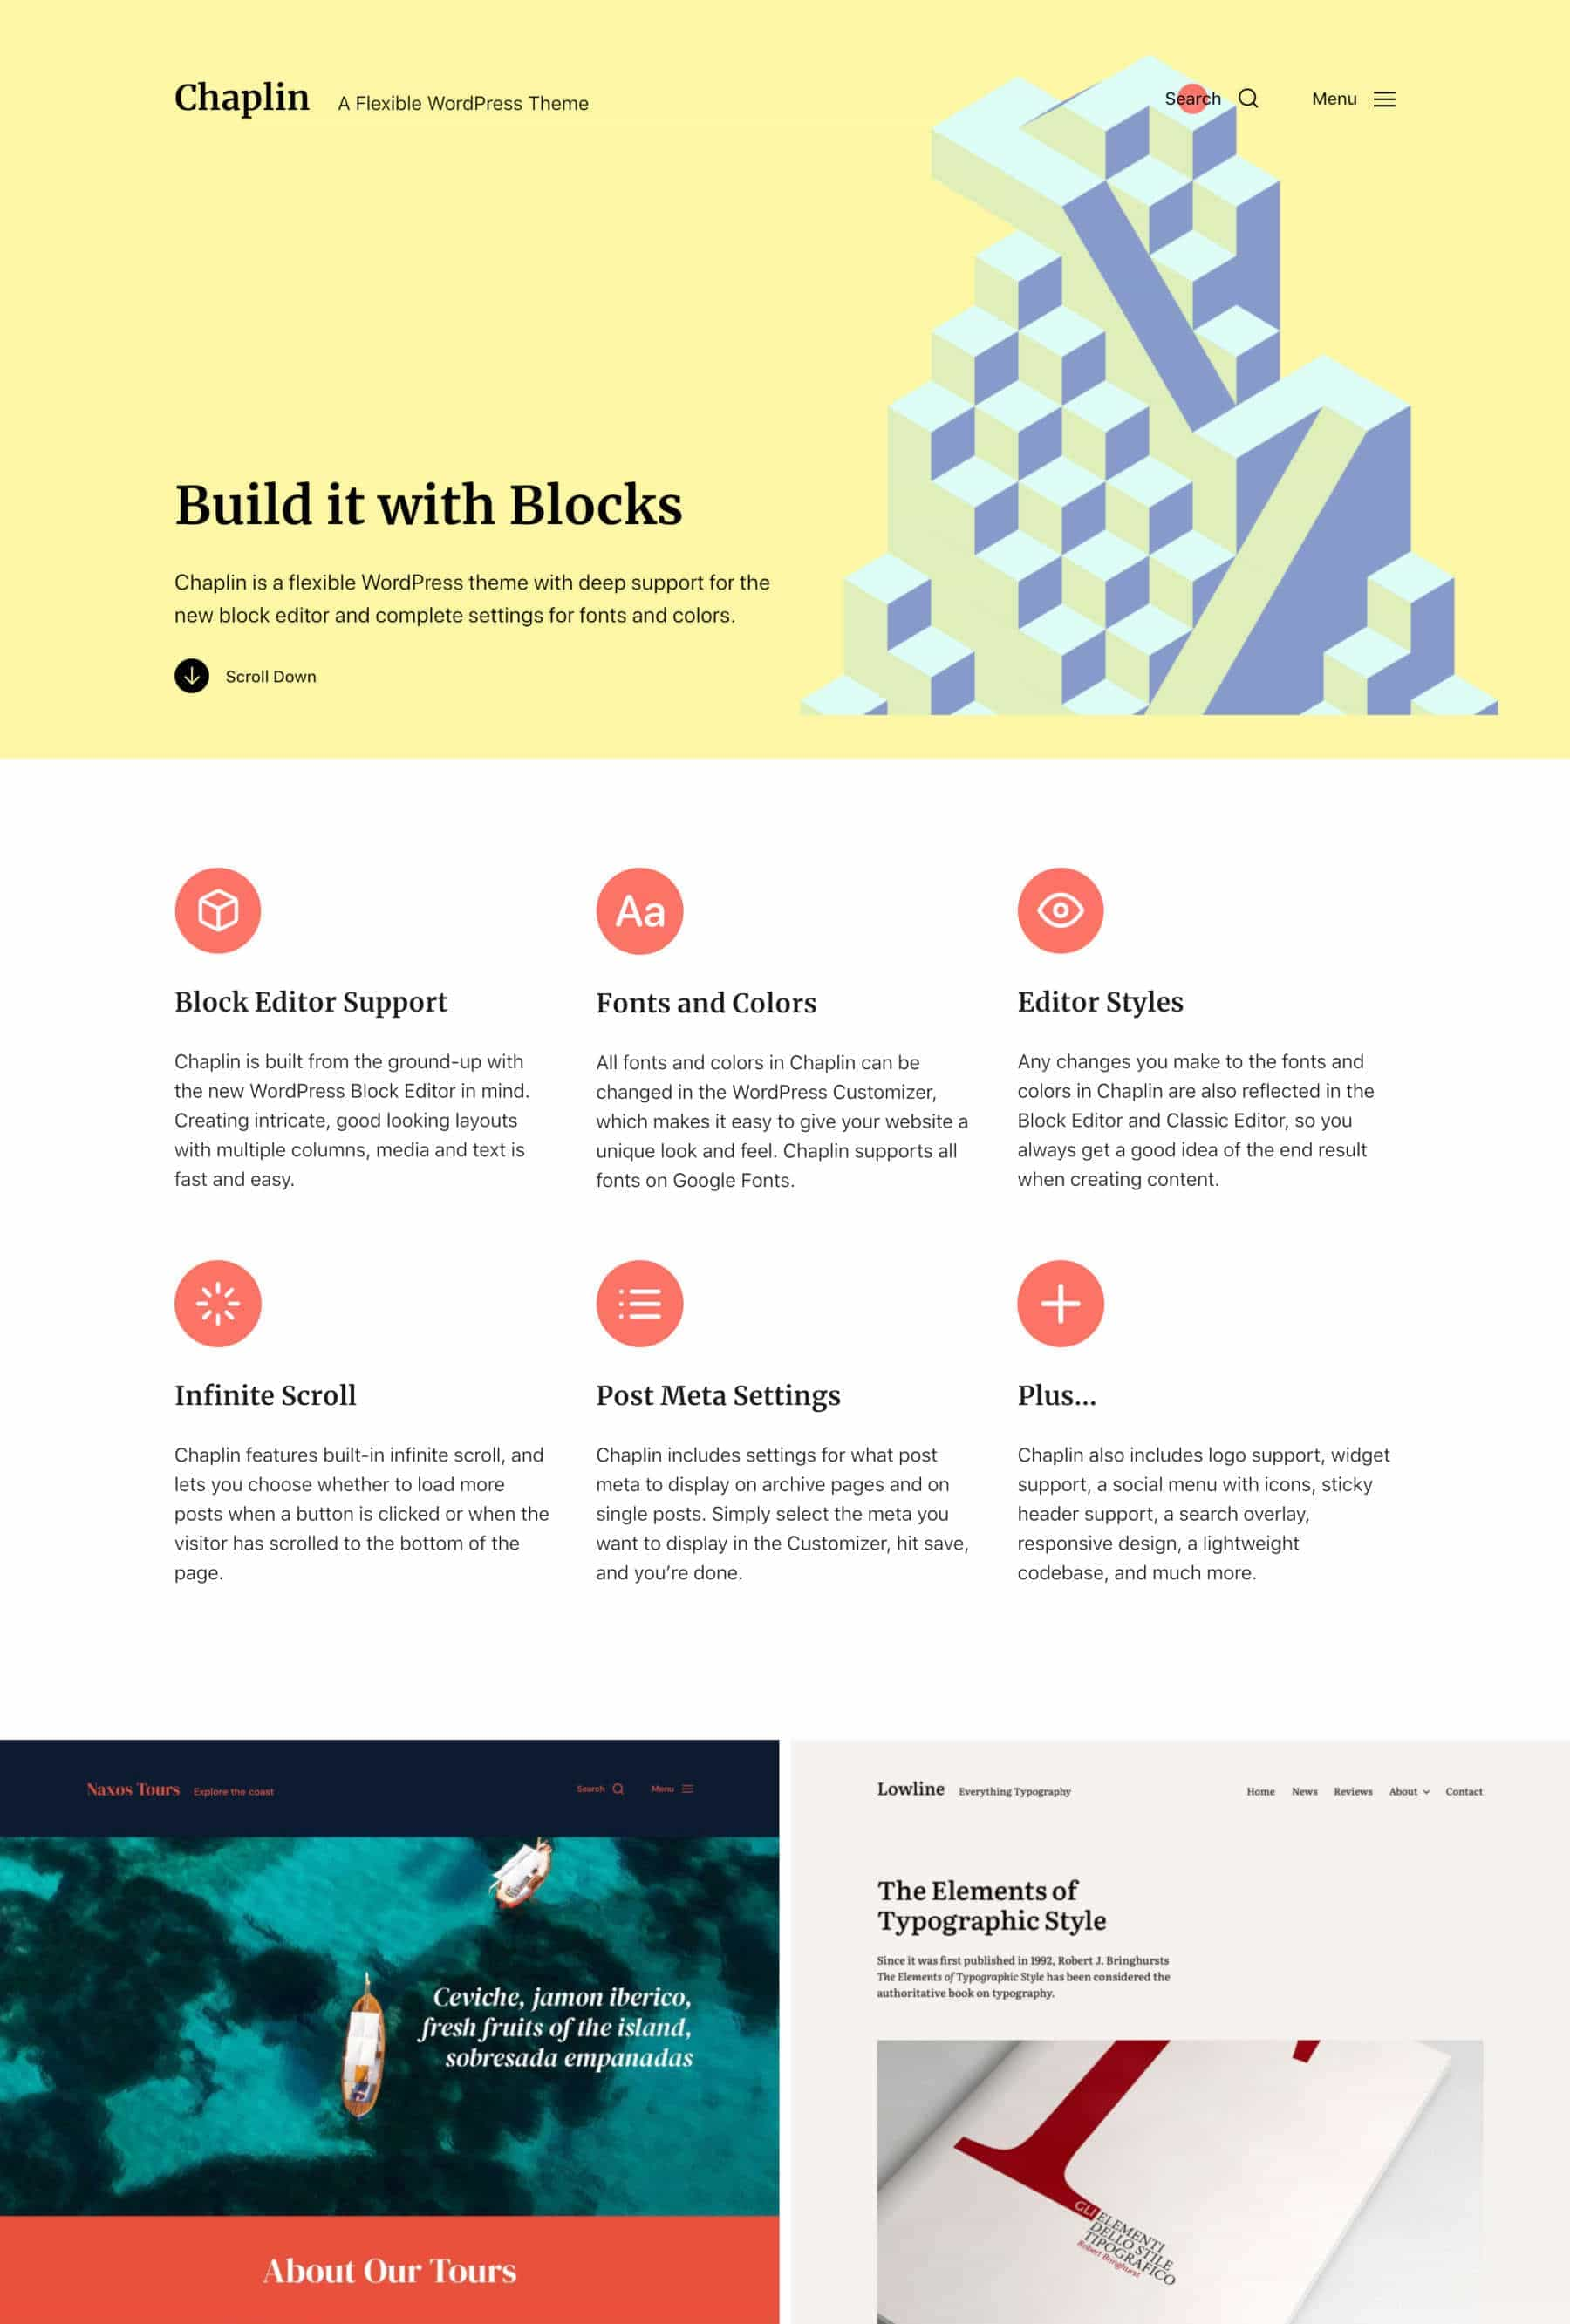
Twenty Twenty is built with a focus on flexibility, clarity, and readability for the new theme. It comes with a single column layout and has three post/page templates, this is created with an aim to give WordPress admins and designers the freedom to create their custom layouts directly on the Block Editor. This way, users can take the complete advantage of wide and full-width alignments for block elements like columns, images and the group block introduced with Gutenberg 5.5.
Additionally, Twenty Twenty comes with the Inter typography, which is focused on readability of mixed-case and lower-case text, especially with small font sizes.
Brief about Twenty Twenty theme –
- In WordPress version: 5.5 by default.
- New in this theme: Fully featured WordPress themes like automatic feed links, post thumbnails, title tag, and some HTML5 elements, it is also built for Gutenberg.
- Primary agenda of the theme:To give freedom to developers and site admins to build custom layouts for their posts and images.
- Mobile Support:Yes, supports mobile.
- Customizable Features: Custom themes, custom backgrounds, custom logos.
This is the evolution of all default WordPress themes, from which you can choose anyone. But I think choosing the latest one is always the best option, to use all the features to its fullest.
Related: 8 Best free WordPress Themes for Affiliate Marketing Websites
Have you chosen your favorite theme?
Let’s incorporate it now.
# How to install WordPress theme?
Here’s a tutorial that explains how to install and activate themes on your WordPress site.
Log in to WordPress using your site admin page/account.
On the WordPress Dashboard, click on Appearance.
Under Appearance, click on Themes.
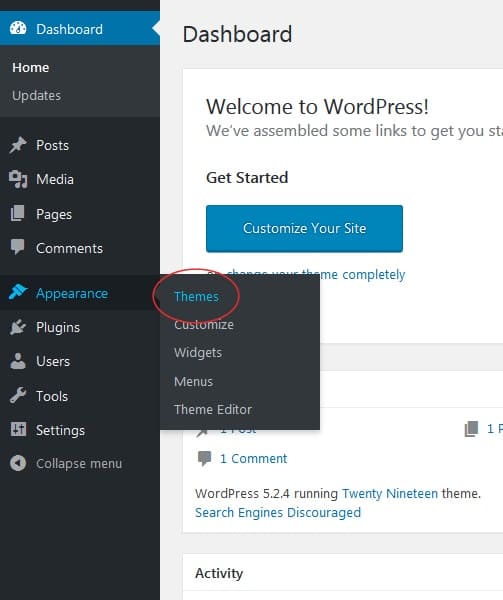
Now, you can see all the themes that you have already installed in your application. Now, to add another one, click on Add New button.

Now, there are two ways to add new themes.
(i) Search from the WordPress.org theme directory.
(ii) Upload a theme from local directory.
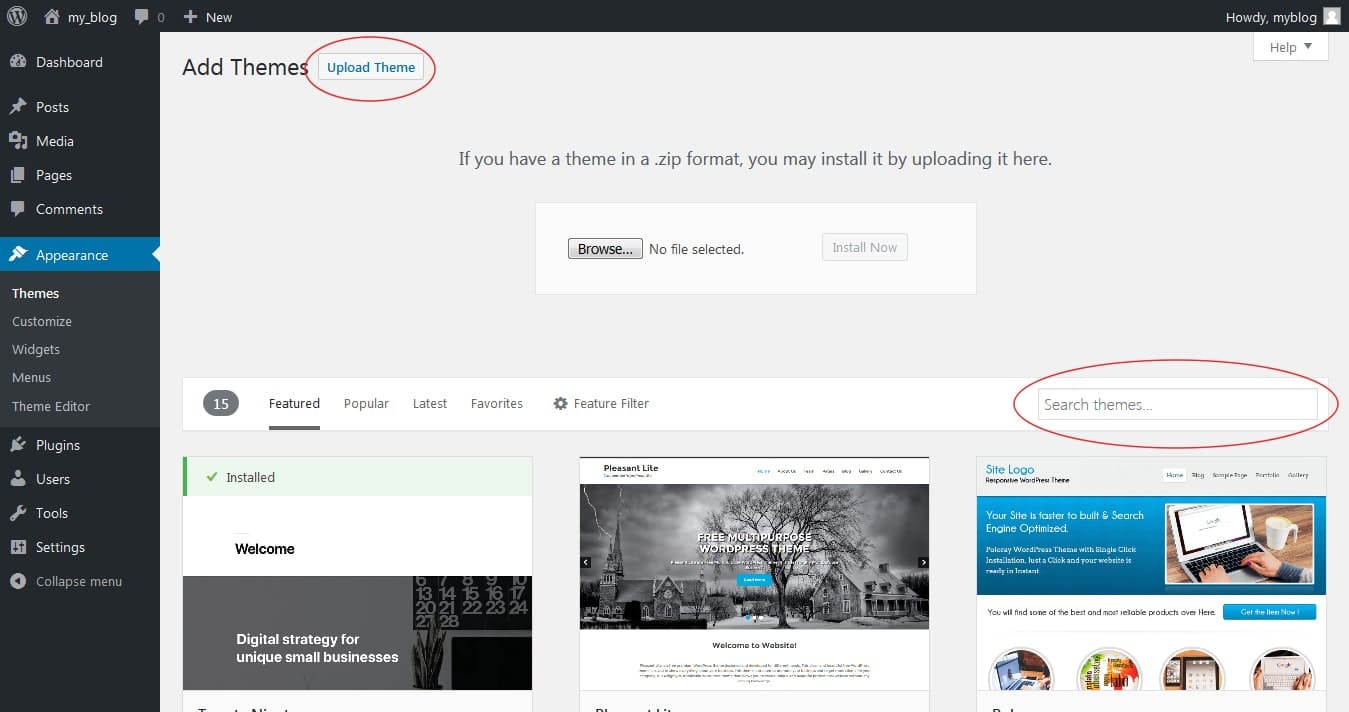
We will see, how to choose and install a theme from the official WordPress theme directory.
The easiest way to install themes to your WordPress site is to look if they are already listed in the official themes directory. This enables to search for the theme that matches your requirements, directly from your site admin page. Each theme present in the official directory needs to have Tags that define its functionality allowing you to easily search for the right theme.
You can simply search a theme by your blog category.
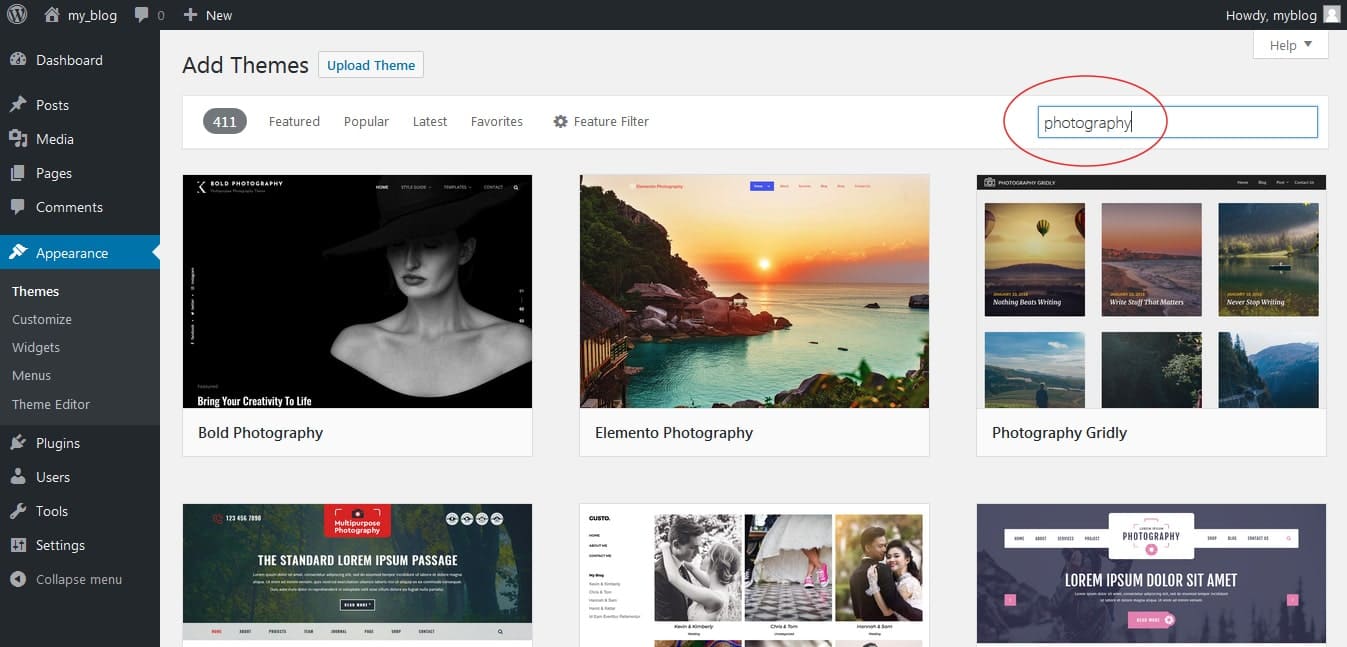
Remembering tags for the desired theme is not the only case. You can also use the Feature Filter to get your desired theme. For example, for a theme, you can just specify its features like Two columns and a Flexible header. Only click on the checkboxes in-front of those tags and click the Apply Filters button.

Now, you can see all the selected themes, float the pointer on any of them and you can see two options – preview of the theme or install it. Once you fix which theme you want to use for your site, click on the Install button.


WordPress application will download and install the theme for you, while you just need to click on the Activate button on the same page, to activate and use the theme.

That’s it.
Go to the front page of your site and see its new look.
# Steps to upload a theme that you have already downloaded
If you have found another theme that is not listed in WordPress.org, then you can simply upload it from your Themes-> Install Themes section in WordPress. Perform this simply by clicking on the Upload Theme button at the top of the page.
Now, click on the Browse button, select the archive of your theme from your local computer and then click on Install Now button.
Within a few seconds, WordPress will upload and extract the theme archive for you. After that, you just need to click on Activate link under the message to enable the theme on your website.

That’s it.
Go to the front end of your site and see its newly activated look.
Now, you must have gained knowledge about the WordPress themes and how you can incorporate them to your site.
Moving forward, you need to mold a theme to suit your business profile, and to do so adjusting the business logo and background color takes the front seat. Whenever a visitor comes to your site, he will also notice the professional behavior of your site. So, let’s give a professional touch to the site.
# Easy methods to add a custom dashboard logo in WordPress :
Most often people replace WordPress logo with the custom logo for the branding purposes. It is the best way of advertising on your own site.
Method 1: Steps to add a custom dashboard logo in WordPress using a plugin.
This is a very easy method and is favorite among non-coders, that’s why is widely used.
To get started with this method, first, you need to install and activate the White Label CMS plugin.
After activation go to Settings-> White Label CMS page and click on the Branding tab to expand it.

Now, click on Upload to insert your custom logo. Click on Save Changes button to store your desired settings.
That’s it!
Your custom logo has been added.
Method 2: Code snippet to manually add custom dashboard logo in WordPress
This method is very comfortable for the coders/users those can easily paste code snippets in WordPress.
To do this, first, you need to save your logo as a custom-logo.png file on your local computer. The logo size must be 16 x 16 pixels in dimensions.
When you have your custom logo ready, then you need to upload it to /wp-content/themes/your-theme/images folder using the FTP. If your theme doesn’t contain any images folder, then you will need to create it.
Once custom logo image is uploaded, just add this code to your theme’s functions.php file or a site-specific plugin.
function wpb_custom_logo() {

echo '

<style type="text/css">

#wpadminbar #wp-admin-bar-wp-logo > .ab-item .ab-icon:before {

background-image: url(' . get_bloginfo('stylesheet_directory') . '/images/custom-logo.png) !important;

background-position: 0 0;

color:rgba(0, 0, 0, 0);

}

#wpadminbar #wp-admin-bar-wp-logo.hover > .ab-item .ab-icon {

background-position: 0 0;

}

</style>

';

}

//hook into the administrative header output

add_action('wp_before_admin_bar_render', 'wpb_custom_logo');
This code will add CSS that is required to display your custom logo in the WordPress admin bar.
That’s how you can add a custom logo in WordPress that signifies your business.
Till this step, you can easily create a full-fledged business website. But, as they say, that you need to update your site as per new requirements so that it doesn’t look like a dead website.
New features, customized plans need to be added to a site as per the requirements and to do so, you don’t have to again create a new site and follow all this process again. So to cope up with such a situation you must have a child theme.
A child theme in WordPress is a sub-theme that inherits all the features, functionalities and style from its parent theme. Child themes are a safer way to modify a WordPress theme without actually making changes to the parent theme’s file.
Related: Do You Need A WordPress Child Theme?
# Easy method to create a Child Theme in WordPress
To create a child theme you need access to the WordPress admin area and access to file manager or FTP.
First, you will need to create a directory for the child theme in the existing wp-content/themes directory. To recognize it easily you can add -child at the end of the parent theme’s name. You can either use an FTP client or File Manager to create a new directory.
In the following example, we are going to use File Manager to create a child theme based on the Twenty Nineteen theme, thus the full path to the child theme folder will be wp-content/themes/twentynineteen-child.
1) Login to control panel and click on File Manager.
2) Identify your WordPress installation directory (also known as public_html) and open the wp-content -> themes folder.
3) Now click on create new folder icon, enter your child theme name and click on Create.
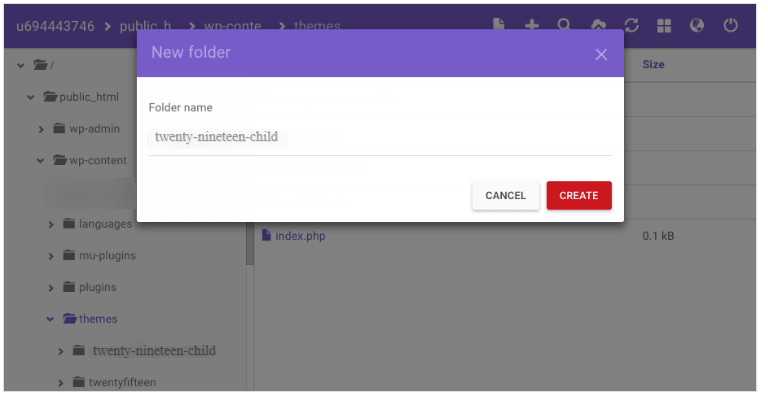
4) Access your newly created child theme’s folder.
5) Click on New File, enter stlye.css as the file name, and then click on Create.

6) Add following code to the file :
/*

Theme Name: My Twenty Nineteen Child Theme

Theme URI: https://example.com

Description: A child theme for Twenty Nineteen.

Author: Your Name

Author URI: https://example.com/

Template: twentynineteen

Version: 1.0

License: GNU General Public License v2 or later

License URI: https://www.gnu.org/licenses/gpl-2.0.html

*/
7) Give a name to your new theme and change all other values to match your theme and domain name. Here the most important field is Template field because it tells WordPress which parent theme your child theme is based on. After doing all changes, click on Save.

8) Add a new functions.php file in the same folder, but take care that you don’t copy-paste the code from the parent theme file, because it needs to be kept separate from any type of modifications that you make to the child theme. To do so, you can create a blank file or add any new .php functions required for your child theme.
9) From the WordPress admin account, go to Appearance -> Themes and you can see your newly created child theme, click on Activate.
10) Now visit your website, and you can see the theme. There will be some obvious issues because the functions.php file hasn’t yet loaded the CSS from the parent theme.
11) To fix the issue, go to the WordPress admin area, navigate to Appearance -> Theme Editor and select functions.php.
12) In WordPress you can load the CSS from parent theme using a function. To do so, copy and paste the following code to the child theme’s function.php file :
<?php

add_action( 'wp_enqueue_scripts', 'enqueue_parent_styles' );


function enqueue_parent_styles() {

   wp_enqueue_style( 'parent-style', get_template_directory_uri().'/style.css' );

}

?>
13) Click on Update to save your desired changes.
14) Again visit your site and you can notice that the CSS is loaded and your child theme looks exactly the same as the parent theme.
Related: How to Improve Landing Page Performance of Your WordPress Website?
Worried about creating a WordPress site?
WordPress themes make it easy for you if you follow all the above-mentioned steps properly.
Want to get started?
MilesWeb Offers India’s Best WordPress Hosting Plans also Business Hosting that is powered by AWS Cloud.
# Let’s hop-up to the points to be considered during selecting a perfect WordPress theme.
As we have seen WordPress offers you amazing themes, but you need to select the best one, isn’t it? To know your ‘best suit’ theme get a quick look at the following points.
1) Keep it Simple :
Most of the WordPress themes come with lots of colors, complex layouts, eye-catchy animations, etc. But, it is not mandatory to use all these features forcefully, instead use them as per their needs only.
Find out the theme that helps you to reach your website’s goal. Yes, a website must look good without limiting its usability and simplicity. Ensure that your theme’s style is not complicated, and users can easily navigate through it. Visitors must find the information they are looking for as this will help you to achieve your site’s goal. If the site looks good but doesn’t get a good amount of visitors or subscribers then it cannot be counted as a good site and this tells that you need to work on the enhancement of your site.
2) Pick a Responsive Theme :
The reason to choose a responsive theme is those themes adjust their layout across different screen sizes and devices by their own.
Nowadays, more traffic comes from mobile phones and other handy devices. Even Google shows mobile-friendly websites on top of their search results. Your site topic and demographics don’t matter, if you have a website, it must be easily accessible on mobile phones.
So, to test a website performance of mobile phones you should check the sections, layout, color, logo adjustment properly.
The best way to check whether is the theme is responsive or not, you should resize your browser screen. When you resize the browser screen, you will notice that the theme’s layout adjusts itself to the screen size. If you think, the site needs some changes, then make sure you do it.
3) Browser Testing :
You never know, which browser is used by your users. So, it is beneficial that you make the theme perfect for all browsers. A theme looking perfect on your browser, may not perform similarly in other browsers also. Thus, it is your task to check the browser testing rigorously, before taking a site in-front of visitors. Browser’s compatibility with Google Chrome, Firefox, Internet Explorer, Safari, etc. are the must check.
4) SEO Friendly :
WordPress theme plays an important role in the site’s SEO performance. A good looking site may not always be an SEO’s favorite, if it has poor HTML code then it may not perform well on search engines. Again if the website has complex layouts that confuse visitors then it can increase a bounce rate, which affects the site’s performance.
5) Multilingual Benefits :
Most of the sites are in the English language. But, you may create a website in other languages also, to connect more easily with the audience. Making a website that supports your local language is the best way to create a relationship with the local market, which builds trust. So make sure, the theme that you choose supports the multilingual WordPress plugins or is ready for the language translation.
6) Supports Plugins :
WordPress has many plugins, each with some beneficial feature. These plugins help you to make your WordPress theme perform like a superhero. Thus, ensure that your WordPress theme supports all popular plugins, you can also take help from a professional developer.
7) Supports Page Builder :
A page builder is a WordPress plugin that allows you to create a page layout using the simple drag and drop user interface. Most of the premium WordPress themes, come with pre-installed Page Builder, but if your chosen theme doesn’t have it, then you need to install it. Before using any type of Page Builder, make sure that it is already used by many of the WordPress users. This is why, theme needs to support page builder that enables you to create landing pages.
8) Don’t use too many Google Fonts :
Not all the themes provide limited options to customize the site design, some of them also allow you to adjust their font with the use of CSS. Having different customization options is good, but that doesn’t mean you shall use all of them. Use hardly 2 fonts on your site that can differentiate important information and features. A theme should be friendly to use Tahoma, Verdana and Serifs fonts.
Do you know, WordPress gets 132 million Spam messages every month?
After doing so much for your WordPress site, don’t you want to look at its security aspects?
# Following are some tips to improve WordPress theme security –
1) Disable unnecessary Themes and Plugins Editor :
We all know configuring themes and plugins is a very convenient option in your WordPress theme, but the excess of anything always leads to risk. The theme editor that is built-in WordPress website dashboard is a bit risky because it can be accessed through malicious code without even having your access to cPanel. So, to stay protected from such situation, all you need to do is, go to your wp-config.php file, which is located in the root folder of your WordPress installation, and enter the following code :
// Disallow file edit
define( ‘DISALLOW_FILE_EDIT’, true );
2) Keep a boundary to the access of the plugins directory :
Hackers can search for any vulnerability in your plugins if they have access to your plugins. If you restrict access to the plugin directory, then it gets difficult for hackers to find ways to access your website. For this, you need to upload a blank index.html file to your root WordPress directory or simply open your .htaccess file in your root folder and add Options -Indexes at the starting of the file.
3) Use of WordPress Firewall for Security :
Generally, plugins become hacking prone because of a zero-day vulnerability. Even if you have recently installed the plugin or new updates, nothing can work for you. If hackers find such vulnerability, then within no time they will access your site. Thus, to avoid such attacks on your site, you need to use a WordPress firewall. The firewall acts as a filter and keeps all the threats away from your site.
4) Validate Data :
Validating the data is the core step to protect your themes and plugins from malicious code injection. Given the proper data validation, will secure your website from any kind of invalid entries.
For example: if your readers are filling some incorrect message on your testimonials page, then they must again enter the correct message. This prevents the injection of malicious code to your website.
These are some basic WordPress security tips. When you actually start working on it, you will find many ways to do so.
Bottom Line :
WordPress has become a favorite CMS for many developers and its use has been increasing daily. Thus the competition and malicious activities are also rising in it, so, it becomes your responsibility to choose the right theme and secure it from hackers. Hope this article will help you identify the best theme for your WordPress site, and increase productivity through it.

